Showing posts with label gluten free. Show all posts

Celiac Awareness!

The move went...  well...  I guess.  We haven't gotten everything from our last house, and it's going to take some time finish getting the rest of it.  The worst part?  We don't really have furniture, and we haven't had time to run by Ikea to get the stuff we picked out.  We're living out of boxes and trash bags and sleeping on our sleeper sofa.  Honestly, though, I don't mind at all!  I am absolutely smitten with our new place!


Tonight, we're going to talk about something near and dear to me, Celiac Disease and gluten intolerance.  I'm going to pepper this post with photos of my mani to break things up a bit, but I'll save the info on the polishes I used until a little later.  Also, since we're in a new place, I'm having to deal with new lighting for my photos.  I apologize if they aren't as vivid.  I'm hoping once we get everything unpacked and moved like we want, my photos will be back to normal.


While I don't suffer from Celiac Disease, I am gluten intolerant, which makes eating certain foods quite tricky.  In 2008, I came down with Salmonella poisoning while visiting my parents in Florida.  Needless to say, I refuse to eat turkey burgers from anyone other than my family.  After that incident, I have had problems digesting foods with gluten and lactose.  I started having serious upset stomach issues, and for a few years, I had no idea what was happening.  I read about gluten intolerance, and thought, why not cut out gluten and see what happens?  So I did.  And my world has been forever changed.  


When I cheat and eat gluten, I feel horrible for a couple of days and retain water like mad.  That's even just ONE piece of bread.  It's especially hard because I have a serious love affair with craft beer.  I still drink it, which is stupid, but I enjoy it and put up with the symptoms.  I was really good about not cheating for several months and felt so much better, which is how I discovered that I had an intolerance.  I need to be better about my eating, but I've been soooo lazy with my shopping and my weight loss and menu planning lately.


Here's a little info about Celiac Disease from the National Foundation for Celiac Awareness.


What is Celiac Disease?

Celiac Medical ImageCeliac disease is an autoimmune digestive disease that damages the villi of the small intestine and interferes with absorption of nutrients from food. What does this mean? Essentially the body is attacking itself every time a person with celiac consumes gluten.
Do you have celiac disease?
Take our celiac disease symptoms checklist »
Celiac disease is triggered by consumption of the protein called gluten, which is found in wheat, barley and rye. When people with celiac disease eat foods containing gluten, their immune system responds by damaging the finger-like villi of the small intestine. When the villi become damaged, the body is unable to absorb nutrients into the bloodstream, which can lead to malnourishment.
Left untreated, people with celiac disease can develop further complications such as other autoimmune diseases, osteoporosis, thyroid disease, and cancer.
Interestingly, I also suffer from Hashimotos Thyroiditis, which is an autoimmune thyroid disease.  To find out more about Celiac Disease, examples of symptoms, and what you can do if you think you may be suffering from Celiac or gluten intolerance, check out the National Foundation for Celiac Awareness.


The official colors for Celiac Awareness are green and yellow, so naturally I had to use my favorite yellow and green polishes from one of my favorite makers, Pam of Girly Bits.  The mani I've been showing off is a gradient of Girly Bits Glo Worm and Banana Hammock.  Since they are both jellies and sheer, I decided to do the gradient over two layers of OPI Alpine Snow, a nice white creme.  Although, I think I should've let it dry a bit longer as I messed up the white layers a little bit.  I used a makeup sponge to create my gradient by following this tutorial from Lissa's Polish Addiction.


Next, I topped it with a creation I made for myself last night with Celiac Awareness in mind, Self Satisfied.  I went heavy on the yellow and green neon, which, as I mentioned above, are the official colors of Celiac Awareness.  


Self Satisfied is a glitter topper with green and iridescent shimmers, matte neon glitters in yellow, blue, pink, purple, and green, satin hot pink hearts, matte neon green stars, large fuchsia dots, teal holo moons, and silver holo butterflies.


I felt that this would be a good pairing with the green and yellow gradient.  I'm not going to lie, I felt like I was wearing a parrot on my fingers all day today.


You can purchase Girly Bits at her store, Llarowe, Overall Beauty, and Mei Mei's Signatures.  Follow the lovely Pam on Facebook, Twitter, and Instagram for news and updates on additions to her line of gorgeous polishes.


Do you suffer from Celiac or gluten intolerance?

Recipe Tuesday? Gluten Free Meyer Lemon Cake

Preparing for Thanksgiving has been a bit hectic.  We aren't hosting this year, but my parents are staying with us, which means I had a lot of cleaning to do.  It took me most of Sunday afternoon to get my polish room organized and tidy.  Our Thanksgiving with my family is always a pot luck style lunch where each of us brings a predetermined dish.  I'm making some Brussels Sprouts and a gluten free Meyer lemon cake, while my hubby plans to make his famous cranberry dressing.  He also makes sausage stuffing for his family who usually celebrates Thanksgiving with a mixture of traditional American dishes and Syrian food.  He's 1/4 Syrian, so I am lucky enough to get some super tasty food during the holidays!  One of my sisters is providing ham, a fried turkey, and a few pies.  The other sister is providing a twice baked potato casserole.  It'll be a nice mixture of healthy and not so healthy dishes.  Hopefully, I'll be able to make a decently healthy plate without too much gluten or fatty deliciousness.

Because I am on a clean eating diet, I decided that I wanted to make something that I could eat for dessert.  My sister is making two pies that are AMAZINGLY delicious, but they are both chock full of sugar, gluten, and fat.  I'll still probably steal a bite, but I can't eat a whole piece without getting sick or ruining any weight-loss progress I've made this week.  Last week was a disaster where every piece of food I saw went directly into my mouth, so I'm doing major catch up this week on the whole dieting thing.  Don't worry  I don't starve myself.  I always get between 1400-1700 calories a day!  Only 11 pounds to go!!!!  That being said, I made the decision that I needed to find a dessert that would suit my needs so I wouldn't feel left out or deprived.  Last week, the hubs came home with a Meyer lemon, which I quickly claimed as mine.  [Side note: I LOVE baking, and even though I bake a little less than I used to, I still bake quite a lot.  The hubs is an amazing cook and loves to create unique dishes that are both tasty and healthy.  Sometimes, we battle over ingredients, which is what we did for the lemon.]  Once I knew I had secured the lemon, I had to find a gluten free and no sugar added recipe to try it out in.  I searched around and found this little recipe.  I adapted it to use Xylitol instead of sugar and part skim ricotta instead of the fully loaded stuff.

This recipe is SUPER easy to make and only required minimal dish use, which, in my opinion, is the sign of a good recipe!  I'm sharing it with you guys today in case you're still looking for something to bake for your family.  Let's get started!  First, preheat your oven to 350*.  Next, gather your ingredients.


Ingredients:
2 cups almond flour/meal [You can find Bob's Red Mill Almond Meal at most grocery stores in the organic section.]
1 tsp baking powder
1/4 tsp salt
3 eggs
1 cup cystalized xylitol or sugar [Xylitol can be found in the dietary supplement section at Whole Foods.]
1 tsp vanilla
1 15 oz tub of part skim ricotta cheese
Zest of 2 Meyer lemons
Juice of 2 Meyer lemons

Tools
1 2 cup measuring cup (or medium bowl)
1 large bowl (or stand mixer bowl)
1 stand mixer (with paddle attachment) or hand mixer
1 9 inch deep pie pan or springfoam pan, oiled

First, combine the almond flour/meal, baking powder, and salt in your large/stand mixer bowl.


Next, wash, zest, and juice your lemons.  Then, combine the eggs, xylitol/sugar, vanilla, ricotta cheese, zest, and juice in the 2 cup measuring cup. 


Take a whisk and mix the ingredients until they are well combined.  You may want to add in a little ricotta at a time to make the mixing a little easier.


Then, pour the wet mixture into the large/stand mixer bowl.  Mix on medium-low until all of the ingredients are combined.  Do not over mix or the cake will fall and crack.


Lastly, pour your batter into your oiled pie pan and toss it in the oven for 50-55 minutes.


Bake until the top is a golden color and the center is no longer jiggly.  The original instructions tell you to refrigerate it for four hours before you eat it.  I, however, like my cakes hot, so I dug in just after it was cool enough to eat.  So, the refrigeration step is optional.  This recipe makes 16 servings.


I was SO surprised with how this recipe came out.  I see cake and assume moist, fluffy, cake cake.  This, however, was a cheese cake but without all of the richness that comes with cheesecake.  Also, because I used xylitol instead of sugar, the cake wasn't overly sweet.  If you're looking for the type of cake that makes your tongue tingle with sweetness, I'm sure that could be achieved by using sugar instead of xylitol.  I however, found this cake to be delicious and refreshing!


For those of you looking for the health information, here's what I got from a calorie calculator using all of the ingredients in the picture above.

Total:Calories

2345
Carbs

264
Fat

147
Sodium

1552
Chol

140
Sugar

24
Per Serving:1471799792
Later on in the week we topped it off with some High Road Aztec Chocolate and Caramel ice cream, which was AMAZING.  The coolness of the ice cream with the warmth of the cake is always a nice dichotomy.  But what I liked the most about this pairing was the how the ice cream had heat from the chilies but the coolness of the lemon helped keep the heat from being unbearable.  It was delicious!


Please let me know if you decide to make this recipe.  I'd love to know what you think or if you made any changes and how they went!

If you celebrate Thanksgiving, what are you making for dessert?

Recipe Friday: Chocolate Reeses Cupcakes

Every first Friday of the month means Recipe Friday!!!  Today, I have gluten-free chocolate cupcakes with Reece's peanut butter cup centers and peanut butter frosting.  The cupcake recipe is adapted from here, and the peanut butter frosting is adapted from here.

Ingredients for Reese's filled gluten-free chocolate chocolate-chip cupcakes:


1 1/2 cups almond flour
1/4 cup unsweetened cocoa powder
1 tsp baking powder
2 eggs
1 tsp vanilla extract
1/4 cup grape seed oil
1/4 cup almond milk
2 tbsp agave nectar
3/4 cup dark chocolate chips
1 doz Reese's Peanut Butter Cups


Preheat the oven to 350*.  Line 12 cups with your cupcake liner of choice.


I use a muffin tin with little posts to make it easier to add fillings.  If you don't have a tin like this, you can fill your cup halfway with batter, place the Reese's and then finish filling the rest of the cup.  If you do have a tin like mine, go ahead and put your Reese's on the posts.  Alternatively, you can also wait and add the Reese's after the cupcakes come out of the oven.


In a large bowl, combine the almond flour, cocoa powder, and baking powder.  Mix together.


Add the eggs, oil, milk, agave, and vanilla.


Now, mix well with a hand-mixer.  Don't over-mix or they won't be very fluffy!


Add your chocolate chips and fold into the batter with a spatula.


Spoon into your cupcake tin.  As I mentioned before, if you don't have a tin with posts, add half of your batter, place the Reese's, and finish filling the cup.


Bake for 14-17 minutes until a toothpick comes out with only a few moist crumbs.  *Note: remember that you have candy in the middle, so don't poke it in the middle when you test them.*


Ingredients for no-sugar added peanut butter frosting:


1/2 cup creamy peanut butter
1 packet of stevia
Splash of almond milk (I usually use unsweetened, but was limited to Vanilla at the time of this post)

Put the peanut butter into a bowl and fluff with a hand-mixer.  


Add a splash of almond milk until you get to your desired consistency.  The more milk you add, the less fluffy it will be.  After you mix the milk, add the stevia and mix again.  

**This is not a very smooth frosting because it doesn't use any powdered sugar.  If you're looking for something with a smoother finish, you'll need to use something like this recipe, which is also tasty.  I used a no-sugar added recipe as my husband and I are avoiding cane sugar.**

Put it in a piping bag and pipe!  If you don't have a piping bag you can use a ziplock bag with the corner snipped off.


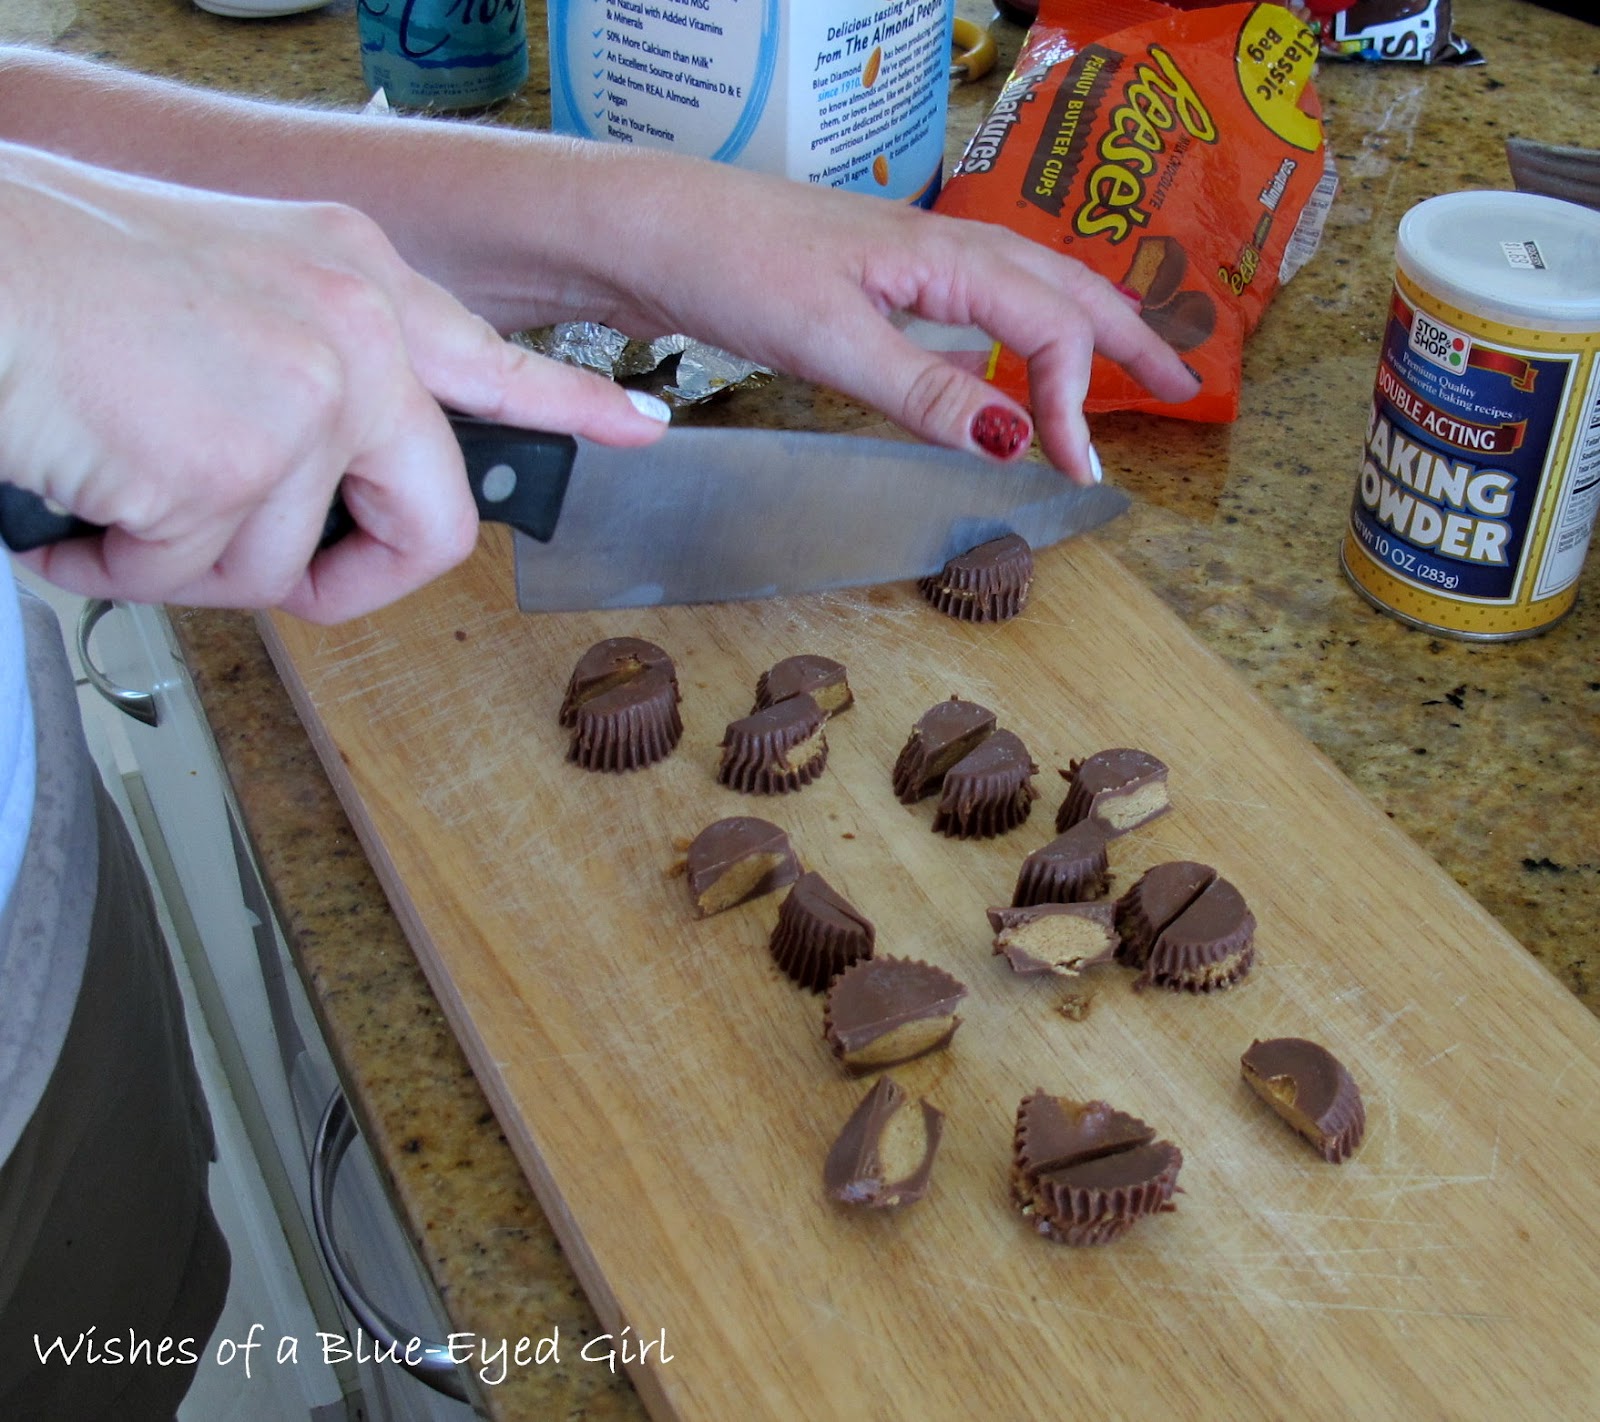
Chop Reese's into halves.  


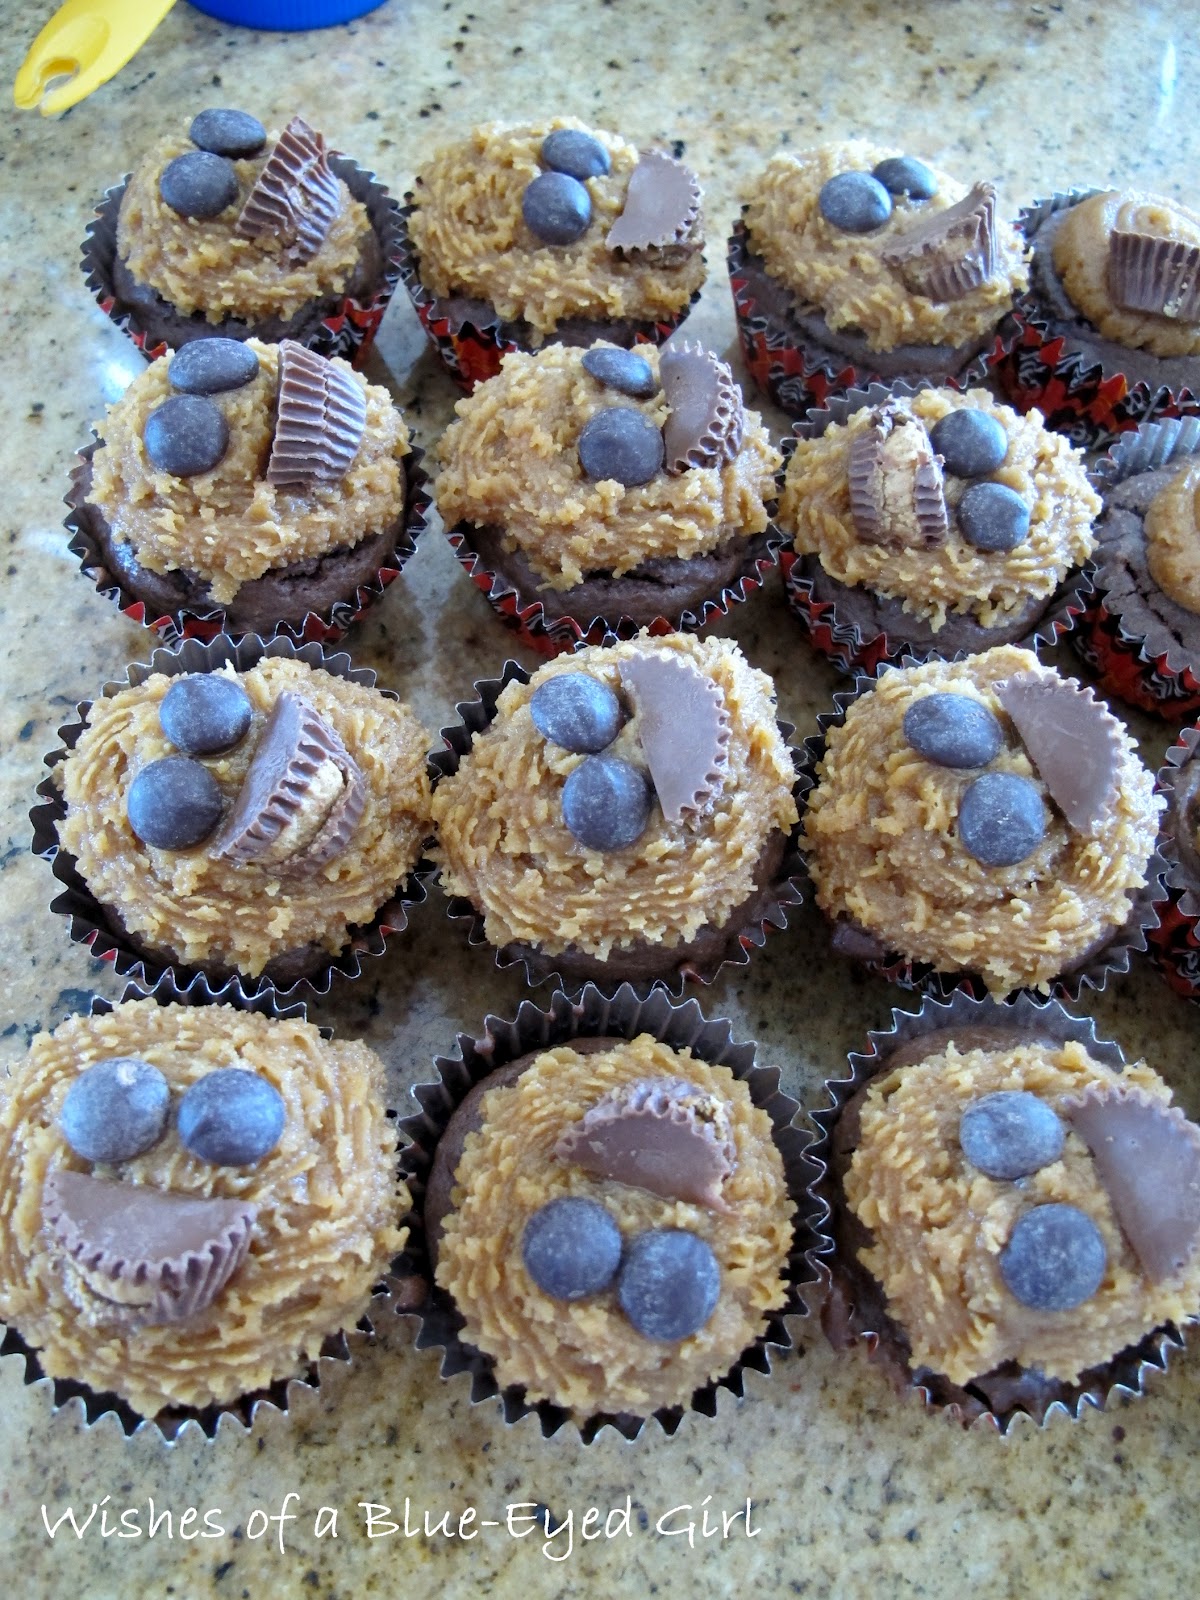
Top your cupcakes with the Reese's halves.  Since the Reese's stuck to their wrappers a bit, they looked like little mouths.  I decided to make the frosting look like fur so I could make little monsters.  I added some chocolate chips for eyes and got a really cute little monster.  I used Wilton 195 to make the frosting look like fur.  


On 8 of the cupcakes, I did not use a tip at all to show you what you can do if you don't have a piping tip.

My sister was trying to snag one while I wasn't really paying attention, lol!

And that's it!  I made these for my dad's birthday / my parents 40th wedding anniversary, and they were a huge hit.  I hope you guys try it!  If you do, let me know what you think.


What's your favorite cupcake flavor?


Gluten Free Pecan Pie Cupcakes

Well, I've spent the last two days either not feeling well or taking care of the hubby while he wasn't feeling well yesterday.  I apologize for the lack of posts!  I promise that I haven't give up!  Since this is my first week, I'm still trying to figure out what posts I would like to make into series or just have as a one-off.  So, for now, I'm tentatively going to say that Fridays are recipe days!  That being said, I have a tasty treat that I hope you will try out for yourselves.


Today, I'm going to bring you something a little different.  I have mentioned before that I am gluten-intolerant.  For years I never knew why I would always feel sick for seemingly no reason.  Finally, after experimenting with eliminating common allergens from my diet, I realized that I just can't eat gluten, milk, or cane sugar.  I know.  It's crazy!  Luckily, I can still eat most cheeses and cream cheese in moderation.


I have a huge sweet-tooth, so I was pretty bummed when I found out that I shouldn't be eating my favorite sweets.  At no time was this more depressing than during the holidays.  So, I bring you my Thanksgiving dessert from last year - Gluten Free Pecan Pie Cupcakes.


This recipe is adapted from Gluten-Free Cupcakes: 50 Irresistible Recipes Made with Almond and Coconut Flour by Elena Amsterdam.


Makes 11


Here's what you need:


These ingredients can be found in most natural food grocery stores.


1 cup blanched almond flour
2 tbsp coconut flour
1/2 tsp baking soda
1 tbsp ground cinnamon
3 large eggs
1/2 cup agave nectar or liquefied xylitol
1 tbsp vanilla extract
1 cup pecans, coarsely chopped
If using xylitol: splash of your favorite milk product (I use Blue Diamond Almond Breeze Almond Milk)


Preheat oven to 350*.  Line 11 muffin cups with liners.


In a large bowl, combine the almond flour, coconut flour, baking soda, and cinnamon.


In a medium bowl, whisk together the eggs, agave / xylitol, and vanilla extract.  If you liquefy the xylitol yourself, be careful adding the hot liquid to the eggs or they may scramble.  Also, you have to work quickly or it will crystallize before you can get all of the batter prepared.  Catch 22?


Blend the wet ingredients into the almond flour mixture with a handheld mixer until thoroughly combined, then stir in the pecans.  If you use liquefied xylitol, you will need to add in your splash of milk in this step.  Almond and coconut flours soak up liquids quickly, which means you need to add in the extra moisture to make up for the inevitable crystallization of the xylitol.


Scoop 1/4 cup of batter into each prepared muffin cup.  I like to use a normal ice cream scoop, as it will usually get the perfect amount of batter into your cup.  Bake for 15 to 20 minutes, until a toothpick inserted in the center comes out with just a few moist crumbs.


Let the cupcakes cool in the pan for 1 hour before decorating.


I chose to make a cream cheese icing for these bad boys, and I'm so glad I did!  Be warned, though, that cream cheese icing is not as stiff as buttercream.  You will most likely need to spread the icing with a knife instead of a piping bag.  Again, I am using a recipe from Gluten-Free Cupcakes: 50 Irresistible Recipes Made with Almond and Coconut Flour by Elena Amsterdam.

Makes 2 cups

3/4 cup heavy cream
8 ounces cream cheese, at room temperature
1/4 cup agave nectar

In a deep bowl, whip the cream with a handheld mixer until stiff peaks form.  In a separate larger bowl, whip the cream cheese and agave nectar until well combined.


Using a rubber spatula, gently fold the whipped cream into the cream cheese mixture.  (You can store this frosting in mason jars for up to 2 days, but probably longer depending on your preference.)


I have never been truly great at decorating cakes or cupcakes.  My icing usually looks like an after school baking project with a bunch of kindergartners.  So, I looked up a few decorating tutorials to learn how to make a pretty swirl on the top of my cupcakes with a spatula.


Yes, I always use my fine silver to decorate cupcakes.  Doesn't everyone?


This was the biggest PAIN in my butt.  It took FOREVER.  My family was ready to eat, but I was stubbornly refusing to be defeated by a cupcake.  I'm so glad I stuck it out because look at these beauties!


Now you can add sprinkles, crushed pecans, or whatever else you like to use to decorate cakes or cupcakes.


Then we tasted them, and they were even better.  I will say, though, that the consistency is a bit more like a muffin and less like a cupcake, but it was very good nevertheless.  It was a perfect ending to our healthy and gluten free Thanksgiving dinner.


Do you have any food allergies?  How do you decorate your cakes or cupcakes?


I'm thinking about doing a blog giveaway once I hit 50 GFC followers.  It will be polish related, and will include at least 1 indie polish from a very popular indie seller.  I will announce the prizes once I get closer to the goal!  Get excited, guys, because I think it's going to be pretty good!  Have a great weekend!