Showing posts with label Nail Art. Show all posts

Review: Bauble New York nail wraps (Or, Holly Jolly!)

Hello!

I have a double-feature today--a review plus nail art. :)

I have been falling in love with the convenience of nail wraps, once I realized that they don't limit nail art, but can actually be just one more awesome tool that enhances nail art.

So far I've only tried one type of wraps, so I was very excited when Bauble New York approached me about testing out a set of their new nail wraps. They have a very nice-sized collection of wraps to choose from, with a range of types, including some designs that are very hard to create on your own--take a look at Life Is But A Dream to see what I mean.

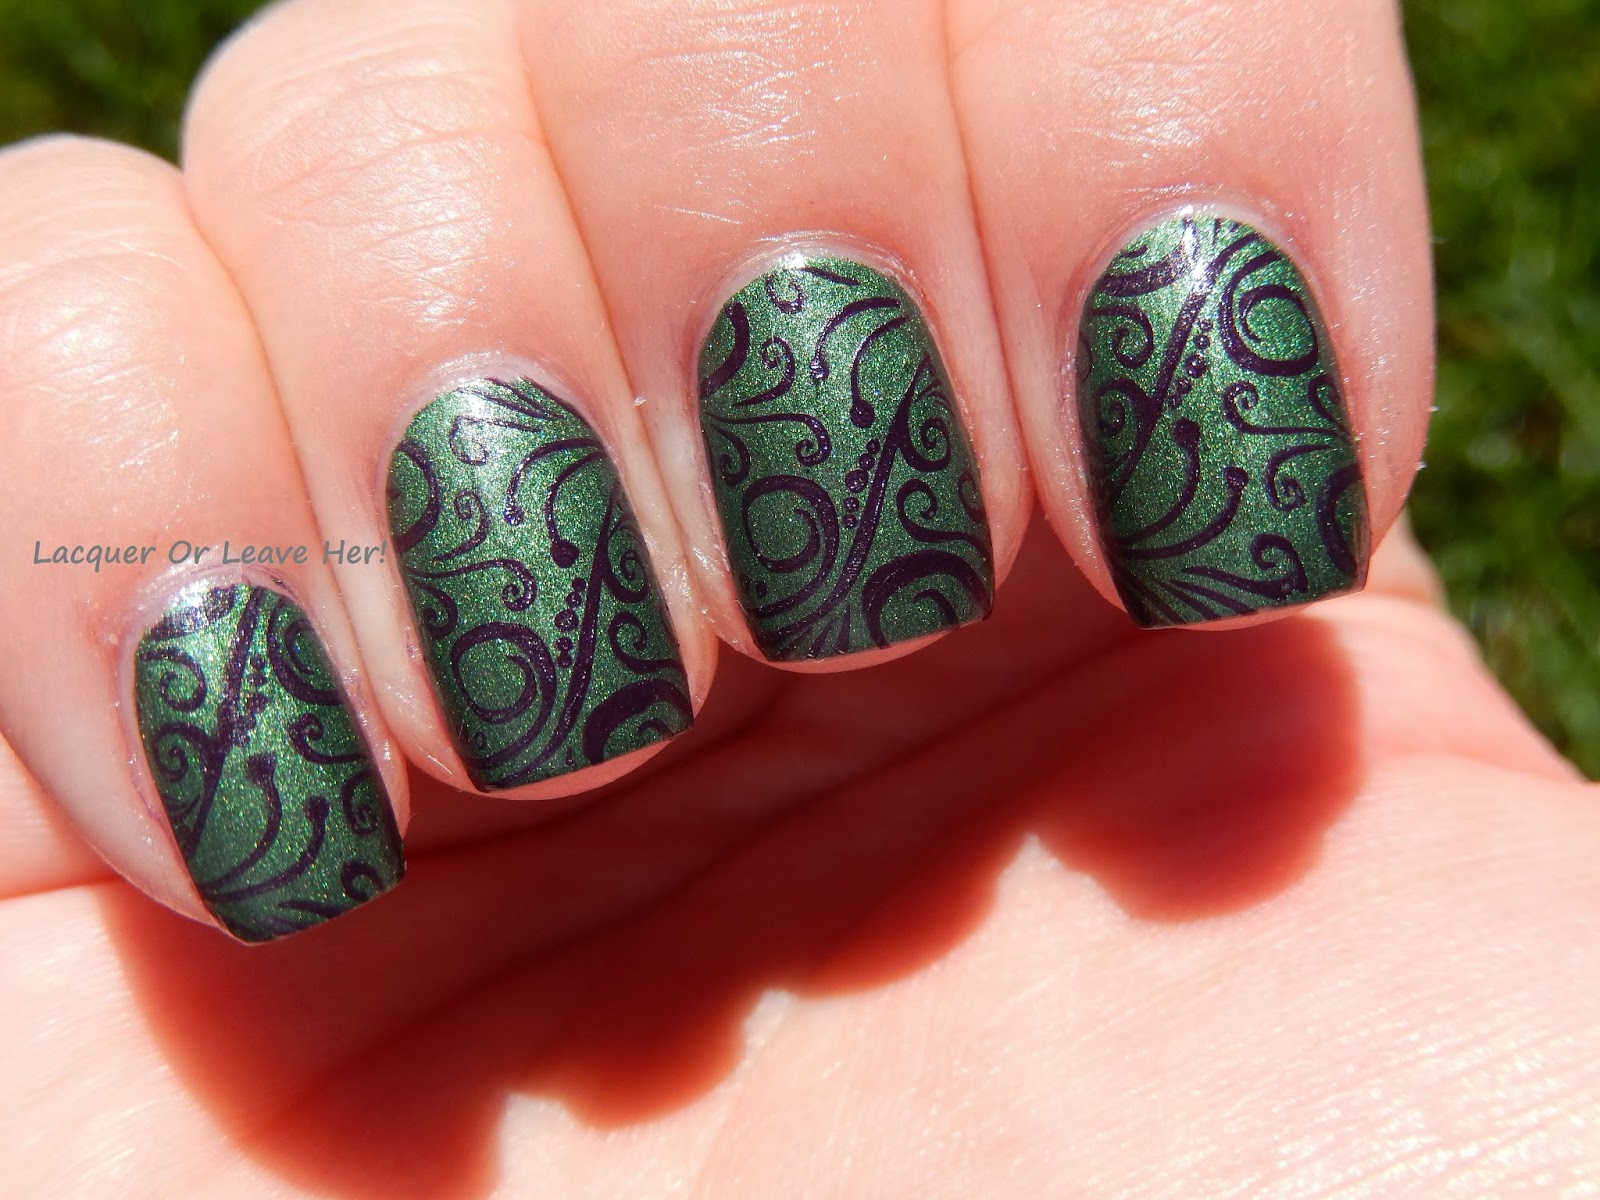
Another beauty is Emerald's Addiction To Gold, the set that they sent me. This set features a gold foil base with a tealish green accenting it. I love this look and often create nail art like it by using nail foils, which can be a pain, can be time consuming, and can be tricky to get the look that you want--so the idea of a set that could create the look with no fuss at all was very appealing:


These work just like the other nail wraps I've tried. You choose the strips that are the closest in size to your nail, then one at a time you peel the top and bottom clear layers off to reveal the nail strip. You place the strip on the nail and put it gently into place, picking it back up and adjusting as needed. Once in place, you push down on wrap firmly to make it seal to the nail. Here is what they look like on:


Bauble New York Emerald's Addiction To Gold


 You'll notice that on my ring finger I have a teeny bit of puckering. This is because I wasn't careful to check that I had it placed correctly before I pressed down to seal the wrap to the nail. You'll notice this didn't happen on my other three nails; this was user error, not an issue with the wraps, and I easily avoided it on the other fingers. Just make sure to double-check all your edges before you go press down over the nail to seal it, and you'll be fine. And notice that even in the pictures it doesn't look that bad, and in person it's actually much less noticeable.

The instructions suggest that you use a topcoat with these nails, but I'm not convinced that you need it. These pictures are without topcoat, and I thought they looked nice and shiny without it--I couldn't tell much difference after I added the topcoat (you can see the topcoated nails in the nail art shots below).

If you do use topcoat with them, the instructions warn that you may get peeling on any edges that weren't pressed down firmly, and this happened to me. They tell you that if it happens, just wait for the topcoat to dry, and then press those edges down again. I did just that, and it worked just fine.

I promised you some nail art with this, and tomorrow's theme in the 12 Days of Christmas challenge is holly--and it seemed to me that this would be a perfect base for some awesome holly. I freehanded some holly leaves on my ring finger with acrylic paints, and then added two sizes of rhinestones for my holly berries. You know I had to have rhinestones, 'cause it don't mean a thing if it ain't got that bling:


Have a holly jolly Christmas! 

It's the best time of the year!
Can you even see the puckering now? That's how not visible it actually is, even though the camera picked it up in the close-ups. And can you tell the difference with topcoat? If you can, you have better eyes than I do. :)

These nail wraps will go on sale starting on Dec. 27th--perfect time to stock up for the new year!

This was a wonderful manicure that was perfect for me today...after a very busy week that was complicated by a cold that sapped all of my energy, I finally felt well enough today to clean the house and decorate. These wraps made it super fast for me to have a festive, fun manicure that looked like it took me forever, and left me time to do other things. I even baked some brownies! A holly-licious manicure was the icing on the cake (or...the brownies?).

I hope you are having a wonderful weekend,
M.


Holiday Nail Designs

Here's my 2014 holiday nail menu, ripe with some pretty easy designs for holiday inspiration. My personal favorite is probably the plaid, but it's hard to decide.


Which is your favorite?

Before & After: Decorations

(Nothing to disclose)

Hello!

I'm back again just under the wire actually on time (sort of) with today's challenge theme! Today it's the 12 Days challenge, and the theme is 'Decorations'. :)

I started with Julep Mia, a metallic flecked polish that's a tricky shade of silver-green-gold:

Julep Mia

Julep Mia

Julep Mia


Then I stamped over it using Bundle Monster H03. I put both red (Pure Ice Siren) and green (Zoya Hunter) on the image before scraping. Finally, I added some teeny microbeads for accents:


I just realized I put up two three-nail-design manicures in a row! Shows you I'm really into the look right now. Anyway, I like this look because it's soft and elegant; very ladylike and understated. :)

Hope you're having an excellent week,
M.

Before & After: Inspired by my phone backdrop

Hello!

So I've decided to just admit that this month has already managed to get away from me, and jump forward to the next '12 Days' challenge so I can at least give the illusion of being on top of something.

On my phone, I have an app on my phone that shows trees in a wintery scene as my background, and a couple of the trees are decorated with little Christmas lights on them. Santa and his reindeer fly by occasionally, and that becomes more frequent as Christmas gets closer. Since I don't get snow where I live, this is my way of having that snowscape in my life, and I decided to do a manicure to honor that.

I promised you that today I would be doing a review of the half-bead microbeads I showed you yesterday, that Born Pretty Store sent me for review. These are a 100% improvement over the full-sphere ones, because they are only half of a sphere each:

Born Pretty Store half microbeads

This makes them a lot easier to work with, because they don't roll around everywhere if you dump a few of them out of the container; they also are easier to apply and don't stick up as much as regular microbeads. And while I've never had too much trouble keeping microbeads on because I tend to cover well with topcoat, the increased contact area with you nail keeps these on longer than normal microbeads.

For my manicure, I started with the same polish as yesterday, China Glaze There's Snow One Like You; I was very pleasantly surprised after yesterday's post to find out there are a number of you out there that like this besides me! :)


China Glaze There's Snow One Like You

China Glaze There's Snow One Like You


 Then I free-handed some simple trees on three of the nails with Glittering Garland, a dark pine green jelly with gold shimmery bits; I drew an outline of the trees with a small art brush and then filled in with the polish brush itself. I finished by decorating my tree with the half-beads:


You can see how the flat side of the beads changes the look and the dimension over full-sphere beads; sometimes you might want the other look, and it's always good to have choices! :)

I've been really into having nail art on three of the nails lately...I like the negative space that the plain nail gives, and I think it looks cool when the fingers aren't placed right together: 


What do you think? I'm definitely a symmetry girl, but the symmetry issue is solved because the two hands together make it all look symmetrical, even if each hand isn't, lol. Yes, I have more...let's call them quirks...running around in my head than you can even imagine, and a need for symmetry is one of them!

As always, you can use my code for 10% off your entire purchase at Born Pretty Store; I am not an affiliate, but when I checked yesterday, I had enough purchases with a code that Born Pretty Store will be sponsoring a giveaway, so stay tuned for that as soon as I hear back from them!!!


Hope this manicure helps to keep your spirits bright. :)
M.

Before & After: Winter Wonderland

Hello!

If orange is the new black, can 'one day late' be the new 'on-time' for nail art challenges?? Pretty please?

No, I really do just need to get my act together.


Well, today's yesterday's challenge theme for my Crumpet's Nail Tarts Christmas Winter Challenge is 'Winter Nature (Landscapes, trees, frost..)', so today I created for you my version of a Winter Wonderland.


I started with this most controversial of 2013 Holiday Polishes, China Glaze There's Snow One Like You. This is a white, glittered, textured conglomeration of a polish that takes the idea of texture to a new apex or nadir, depending on your personal preference. I admit, I am one of the few who truly love it--it looks to me like drifts of snow and makes me feel like my fingertips have that tree flocking stuff on them. I personally think it looks best with a generous coat of topcoat over the top, to smooth it out a bit:

China Glaze There's Snow One Like You

China Glaze There's Snow One Like You

China Glaze There's Snow One Like You

Next, I stamped over it using Barry M Silver Foil and Bundle Monster 407:


Finally, I put little half-beads as accents for the circles on the design; these were sent to me for review from Born Pretty Store, and I will be doing a more complete review of them tomorrow. If you're interested in buying them in the meantime, I have a 10% coupon code (MCL91):


Later on, we'll conspire


As we dream by the fire
To face unafraid, the plans that we've made


Walking in a winter wonderland. :)

I wasn't sure how this would come out stamped over texture, but I do sort of like the way it makes the light shine off of different parts of the trees, almost like it's being lit by moonlight or something. And what do you think, better with the beads, or without? I think the beads add a little special something.


Hope you're enjoying your winter wonderland, whatever it might be looking like. :)

Hugs and loves,
M.


Before & After: Bandit Brocade

Hello!

Yesterday I showed you a manicure I did with Mentality Bandit stamped over Mentality Morality. I tried doing the exact reverse, but Bandit was a little too dark for Morality to show over...so I picked a different stamping polish and created my flip-flop of yesterday'a manicure that way. :)

So here's what Mentality Bandit looks like on it's own:


Mentality Bandit


 Next, to get that pop of eggplant over the top, I stamped with Barielle Edgy (originally a press sample) and Pueen 26:


The last one was more sparkly and this one is more smooth. The contrast is more in-your-face, and it has the feel of a velvet brocade holiday gown, at least to my eye.

So...which one do you like better?

Hugs and loves,
M.

Before & After: Brocade Brigade

Hello!

Looking for a winter look that doesn't scream holidays? Let's see if I can pull one up for you...

To get an awesome head-start, let's bust out a little magical holo-duochrome goodness with Mentality Morality:

Mentality Morality

Mentality Morality

Yeah...that's nice...And since that felt so good, let's do some stamping with a little bit more Mentality--yep, you heard me right, some Mentality on Mentality action--with Mentality Bandit (a moss green matte polish) and Pueen 26:


I love me a good brocade in the winter, especially when it's a holo-matte-duochrome brocade, in gorgeous eggplant and moss tones...Le Sighs--I heave them.

Hugs and love!
M.

Cacee Polish - Spring Collection Swatches & Review

First order of blog business tonight is to thank all of you for entering and spreading the word about my giveaway. It was a wonderful success and a winner has been selected. Congratulations to Christine of Michigan! I hope to offer more giveaways in the future for you all, especially if readership continues to grow!

Tonight I'm swatching another collection from Cacee Polish. I've swatched their BFE summer collection for you before here. This new post is for their spring collection, which I absolutely love! I think I like all of these colors more than the last one, which is difficult to say because there were so many brights in that one.

Here's the nail art I did for it, using Anita as the base.


Isn't that the most gorgeous teal? Click below to read more and see the reviews for all the other colors!


Shown above is Cora in three coats. This is the color of wet sand or sandy clay. Very Native American! It's not the most complementary color for my skin tone, which sucks because I love it. I'll definitely use it in nail art, but not as a base.


Jodi (shown in 3 coats) is a sandy mustard, great for fall. Not quite sure how it wound up in the summer collection, though I could see it working well with the right pink color.


Tess is a military, mossy green (shown in 2 coats). I love this creme to death!


Anita (2 coats) is the base I used in my nail art. It's an amazing creamy teal, definitely a new favorite.


Mae (2 coats) is a totally new color in my collection. It's a dark periwinkle, almost purple. It's not as blue as China Glaze Secret Peri-Winkle and not as pastel as most others. Just dusty and just right.


Finally, there is Mara (2 coats). This is the deepest of navy polishes, almost black. It rounds out the collection perfectly. It also seems to have summoned Slenderman into the reflection of my middle finger. Creepy!

Cacee is a great addition to your collection if you haven't tried it already. It's a totally affordable brand I've seen in my local beauty supply store. Unfortunately, I still haven't made my way out there to find the price.

These products were sent to me by Cacee. The reviews are based entirely on my experience with the products and were in no way influenced by anyone.