
Showing posts with label stars. Show all posts
Showing posts with label stars. Show all posts
Happy Fourth of July!
I hope all of my lovely American readers are celebrating a wonderful warm holiday!

Northern Star Polish Part 1
I have some perfectly summer polishes to show you tonight! When Kristin from Northern Star polish contacted me to review some of her new polishes that are about to be released on Friday, I just knew I had to do it. So, without further ado, here are two polishes that will be released on June 28th. Let's take a look see.
*I was not financially compensated for this post. I received a sample for review purposes. The opinions are completely my own based on my experience. For more information, please see my Disclosure Policy in the tab above.*
Celestial Lullaby

Color: Pale purple base with purple, lavender, and iridescent hexes, white squares and moons, and lavender stars.

Poppy Refreshed

Both of these polishes will be available this Friday at her store, but I'm not certain what time. Follow Kristin on Facebook and Instagram for news and updates. I'll have two more from the upcoming restock later this week! I won't be posting tomorrow as it's my 8 year wedding anniversary, so we're celebrating! Have a great couple of nights, y'all!
What's your favorite summer color?
*I was not financially compensated for this post. I received a sample for review purposes. The opinions are completely my own based on my experience. For more information, please see my Disclosure Policy in the tab above.*
*I was not financially compensated for this post. I received a sample for review purposes. The opinions are completely my own based on my experience. For more information, please see my Disclosure Policy in the tab above.*
Celestial Lullaby

Color: Pale purple base with purple, lavender, and iridescent hexes, white squares and moons, and lavender stars.

Finish: Glitter Jelly – glitter in a colored jelly base.
Bottle / Brush: Round bottle – the brush and wand are the standard width and length. Easy to control and manipulate.


Opacity: Medium – achieves opacity at three to four coats.


Glitter Application: Difficult – difficult to dig the glitters out of the bottle, but spreads evenly once you get them out. It's not supposed to be a glitter bomb, though, so it's ok if there aren't a ton of glitters on your nail with this one. It's meant to be a soft and delicate, so no need to go hog wild with the glitter.


Consistency: Thick – thick, but is easily remedied with some polish thinner. I only added about 3 or 4 drops and that's because I'm weird and very picky about the consistency of my polishes. Most people would probably be ok with the thickness, though.
Overall Ease of Application: Hard – applies with some pooling or balding. Spreads well with manipulation.
Stampability: Not designed for stamping.


Dry Time: Quick – dry to the touch without smudging in under 3 minutes. I've been giving Nubar Diamont another shot. I'm not sure what was up with my original mani I used it on, but I'm really in love. It dries as quickly as SV, but without the bubbles, shrinking, or weird stringiness you get with SV once the bottle has gotten to the halfway point. I may be a convert... I need to test it on more cremes, though, and then I'll know. It could've been that I waited too long and the cremes were already almost dry. I'm not sure, so I'll make sure to get back to you guys on that!

Overall Thoughts: This isn't really a glitter bomb kind of polish. It's a crelly base with a smattering of very pretty glitters. Application was a bit thick, but a few drops of thinner cleared that right up. The glitters were a little harder to get out of the bottle, but flipping it upside down for about 20 minutes before I used it seemed to help. Once you get the glitters on the brush, though, they are easy to spread with the dab method. It's such a unique and pretty polish that I truly loved wearing.
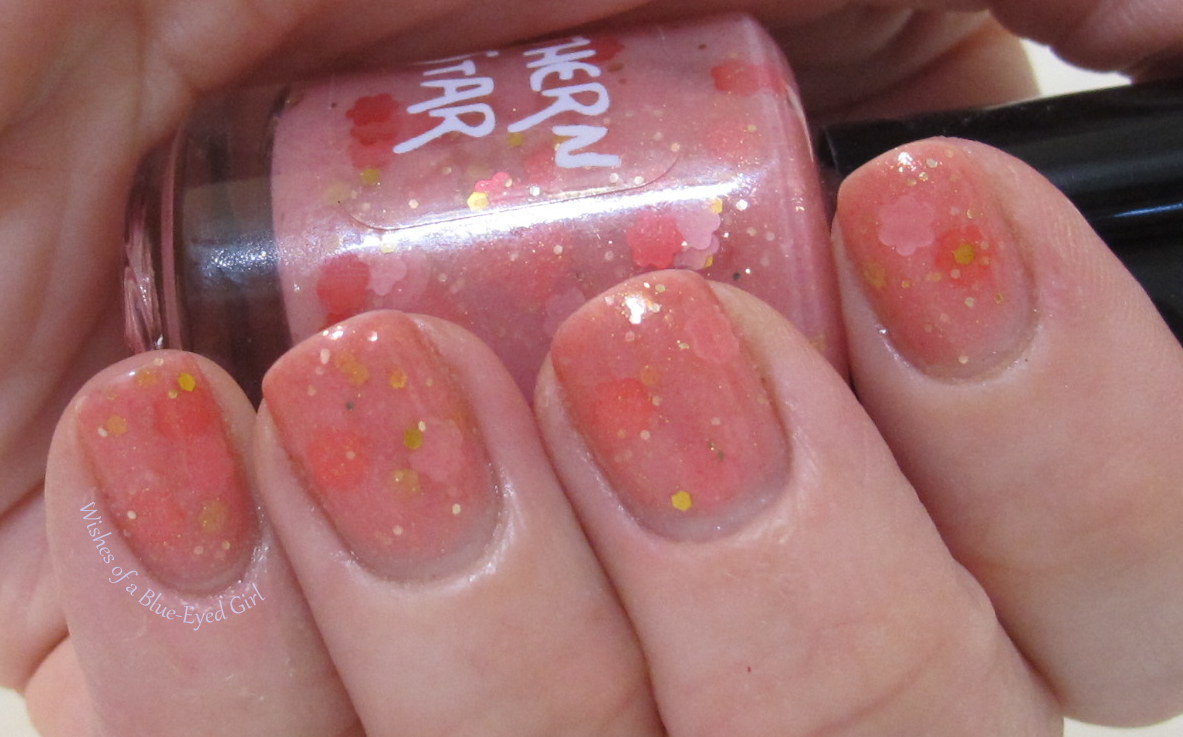
Poppy Refreshed

Color: Coral with gold shimmer, gold hexes, gold holo hexes, and hot pink and light pink blossoms.
Finish: Glitter Jelly – glitter in a colored jelly base.


Bottle / Brush: Round bottle – the brush and wand are the standard width and length. Easy to control and manipulate.
Opacity: High – opaque at two coats! I actually did 3 coats to ensure my photos didn't show anything patchy that I couldn't see with my naked eye.


Glitter Application: Easy – Spreads evenly without much manipulation. The blossoms came out easily, but I wish I could've gotten more gold holo hexes on my nails. Either way, though, it all applied evenly and easily without the need for the dab method.


Consistency: Thick – thick, but is easily remedied with some polish thinner. Again, I only added a few drops because I'm persnickety about my consistency.


Overall Ease of Application: Medium – applies well with minimal pooling, dragging, streaking, or balding. Spreads well without much manipulation.

Stampability: Not designed for stamping.
Dry Time: Quick – dry to the touch without smudging in under 3 minutes.

Overall Thoughts: Again, I'm very weird about my polishes and their consistency. I felt that Poppy was a bit too thick for me, but honestly, it applied easily even before the thinner. The consistency was a bit thick, but it didn't run, pool, or bubble, which is nice. However, I like to add a little bit of thinner to give me more control. I guess I'm a control freak... The glitters were so easy to get out, with the exception of the gold holos, which were a little more stingy. The coral is just soft enough to not turn my hands crazy red. It's a nice summery polish that, if you like corals, you should definitely get.
Both of these polishes will be available this Friday at her store, but I'm not certain what time. Follow Kristin on Facebook and Instagram for news and updates. I'll have two more from the upcoming restock later this week! I won't be posting tomorrow as it's my 8 year wedding anniversary, so we're celebrating! Have a great couple of nights, y'all!
What's your favorite summer color?
*I was not financially compensated for this post. I received a sample for review purposes. The opinions are completely my own based on my experience. For more information, please see my Disclosure Policy in the tab above.*
A glitter gradient!
Wow, I've got a lot of things I'm working on that will, hopefully, translate into awesome things for you guys! I cannot wait to spill the beans, but I must figure out all the details first. Hehehe, I'm not gunna lie, I'm liking these teasers, y'all. Hah! Anyway, tonight, I'm going to show you guys a glitter gradient I did earlier this year over my Comparison Thursday Starry Starry Night comparison with Cosmos. Love her or hate her, it doesn't matter to me because I like to stay out of the politics, but I do love this polish - Lynnderella When the Moon was a Star.


Overall Thoughts: I think this glitter topper was a perfect mate to my Galaxy Nails in a Bottle duo. It helped finish the galaxy look with the added stars and moons. They were easy to get out of the bottle, but I do recommend flipping it upside down before using it for a few minutes to make sure you get as many as you want. I haven't worn this polish over my whole nail yet, but that's something I plan to do soon. As for now, it worked great with this gradient. Removal was a pain, as per usual with glitter bombs, but I used my trusty felt pad soaked in acetone trick, and it came off decently easy. Ain't nobody got time for the foil method.

You can purchase Lynnderella polishes from their store here. Follow the fan run Love Lynnderella Facebook, Twitter, and Instagram for news, updates, and giveaways!
What's your favorite galaxy in a bottle polish?
*I was not financially compensated for this post. All items in this review were purchased by me for my own use. The opinions are completely my own based on my experience. For more information, please see my Disclosure Policy in the tab above.*

*I was not financially compensated for this post. All items in this review were purchased by me for my own use. The opinions are completely my own based on my experience. For more information, please see my Disclosure Policy in the tab above.*

Color: Clear base with blue and holo blue hexes and holo silver stars and moons.
Finish:

Bottle / Brush:
Opacity:

Glitter Application:
Consistency:
Overall Ease of Application:

Stampability:
Dry Time:


You can purchase Lynnderella polishes from their store here. Follow the fan run Love Lynnderella Facebook, Twitter, and Instagram for news, updates, and giveaways!
What's your favorite galaxy in a bottle polish?
*I was not financially compensated for this post. All items in this review were purchased by me for my own use. The opinions are completely my own based on my experience. For more information, please see my Disclosure Policy in the tab above.*
Darling Diva's Lucky Star
*Press Sample* Ok, guys, I'm so beyond excited to show you this polish tonight. Not only is it super hot, it also glows in black light and glows in the dark! Lucky Star is from Darling Diva's upcoming Madonna collection. Let me just say, these polishes are HOT. Like Madonna from the 80's or early 90's hot before she got all veiny and creepy. I have two more to show you this week, and I should have the rest to show you soon. I'm seriously in love. Now for my favorite part, my interview with maker, Carrie, of Darling Diva!
1) Are all of the polishes you've created in one collection? If not, what are your collection names?
Well most recently I had the Back in Black collection based on AC/DC songs, I have a Material Girl collection coming soon based loosely on Madonna songs. This fall I have a "DD" (yes thats bra size lol) collection coming out based on women in comics:) Other than that, in the past I had My Little Pony and a Christmas collection based on the Movie A Christmas Story, other than that I pretty much like to make what I want at the time. I think collections are lovely but so are one offs:)
2) Of the polishes you're sending me, what collection(s) do they belong to?
Material Girl.

*I was not financially compensated for this post. I received a sample of Darling Diva's Lucky Star for review purposes. All other polishes in this review were purchased by me for my own use. The opinions are completely my own based on my experience. For more information, please see my Disclosure Policy in the tab above.*


I also had a bit of problem with the polish thickening as I went through my mani. I spoke with Carrie, the creator of Darling Diva, and she gave me some tips for glow in the dark pigments. Long story short, upon her advice, I added a couple drops of thinner, and Lucky Star was good as new! I always have issues of thickness with glow in the dark polishes, so I wasn't surprised that I'd need to treat Lucky Star a little differently than normal polishes.

Once I figured out how to maneuver Lucky Star (a little thinner, less thick undies, and the dab method), I really enjoyed the look of this polish. It's so bright and reminds me of the 80's and Lisa Frank. It really is a very sweet polish.

The Material Girl collection isn't available yet, but it should be ready for you guys to snap up in a week or two. You can purchase Darling Diva polishes at her store, Llarowe, Mei Mei's Signatures, and Norway Nails. Follow Carrie on Facebook and Twitter for news and updates, especially for updates on the release of this B.A. collection.
Do you have any polishes that needed just a little bit of thinner to achieve perfection?
*I was not financially compensated for this post. I received a sample of Darling Diva Lucky Star for review purposes.*
1) Are all of the polishes you've created in one collection? If not, what are your collection names?
Well most recently I had the Back in Black collection based on AC/DC songs, I have a Material Girl collection coming soon based loosely on Madonna songs. This fall I have a "DD" (yes thats bra size lol) collection coming out based on women in comics:) Other than that, in the past I had My Little Pony and a Christmas collection based on the Movie A Christmas Story, other than that I pretty much like to make what I want at the time. I think collections are lovely but so are one offs:)
2) Of the polishes you're sending me, what collection(s) do they belong to?
Material Girl.

*I was not financially compensated for this post. I received a sample of Darling Diva's Lucky Star for review purposes. All other polishes in this review were purchased by me for my own use. The opinions are completely my own based on my experience. For more information, please see my Disclosure Policy in the tab above.*

Color: White crelly with hot pink squares in two sizes and neon green and black stars.
Finish:
Bottle / Brush:


Opacity:


Glitter Application: Medium – easy to dig the glitters out of the bottle, but it was a little difficult to spread evenly once you get them out due to the base to glitter ratio. You just have to make sure you don't get too much polish on the brush then you can apply it with the dab method just fine. You can also apply more than one layer to get the desired result without applying too thickly.


Consistency: This one is tricky... I would say Fluid – thin but flows easily from the brush at first. However, once it's been open for a little while, it gets a little thicker because of the glow in the dark pigment. I added a couple drops of thinner, then it was perfect!


Overall Ease of Application: Medium – applies with some pooling, but spreads well with manipulation.
Stampability:


Dry Time:

Overall Thoughts: Honestly, the first two times I applied Lucky Star, I did have some problems... As I mentioned above, I had some serious bubbles. They clouded the entire nail, and I was so disappointed. I had a hunch that the problem was really caused by the undies I chose, and I was pretty much correct. The bubbles pretty much disappeared once I used a different white as undies. The minimal bubbling you see here is from my stupid wicked thick NBP Glitter Food... It needed thinning as well.

I also had a bit of problem with the polish thickening as I went through my mani. I spoke with Carrie, the creator of Darling Diva, and she gave me some tips for glow in the dark pigments. Long story short, upon her advice, I added a couple drops of thinner, and Lucky Star was good as new! I always have issues of thickness with glow in the dark polishes, so I wasn't surprised that I'd need to treat Lucky Star a little differently than normal polishes.

Lucky Star under black light
Once I figured out how to maneuver Lucky Star (a little thinner, less thick undies, and the dab method), I really enjoyed the look of this polish. It's so bright and reminds me of the 80's and Lisa Frank. It really is a very sweet polish.

Lucky Star in the dark
The Material Girl collection isn't available yet, but it should be ready for you guys to snap up in a week or two. You can purchase Darling Diva polishes at her store, Llarowe, Mei Mei's Signatures, and Norway Nails. Follow Carrie on Facebook and Twitter for news and updates, especially for updates on the release of this B.A. collection.
Do you have any polishes that needed just a little bit of thinner to achieve perfection?
*I was not financially compensated for this post. I received a sample of Darling Diva Lucky Star for review purposes.*
Subscribe to:
Posts (Atom)