Showing posts with label black. Show all posts

Guest Post: Adventures in Polishland with a Geometric Glitter Mani

Happy Friday from Adventures in Polishland! I'm so excited to be writing for Wishes of a Blue-Eyed Girl today. I thought it would be fun to put a spin on my favorite nail art look, and create a fall-inspired, geometric glitter manicure. While I typically rock light-toned hues, when the weather turns cold I grab the darker polishes. Let me share the edgy manicure I created!

  IMG_3411

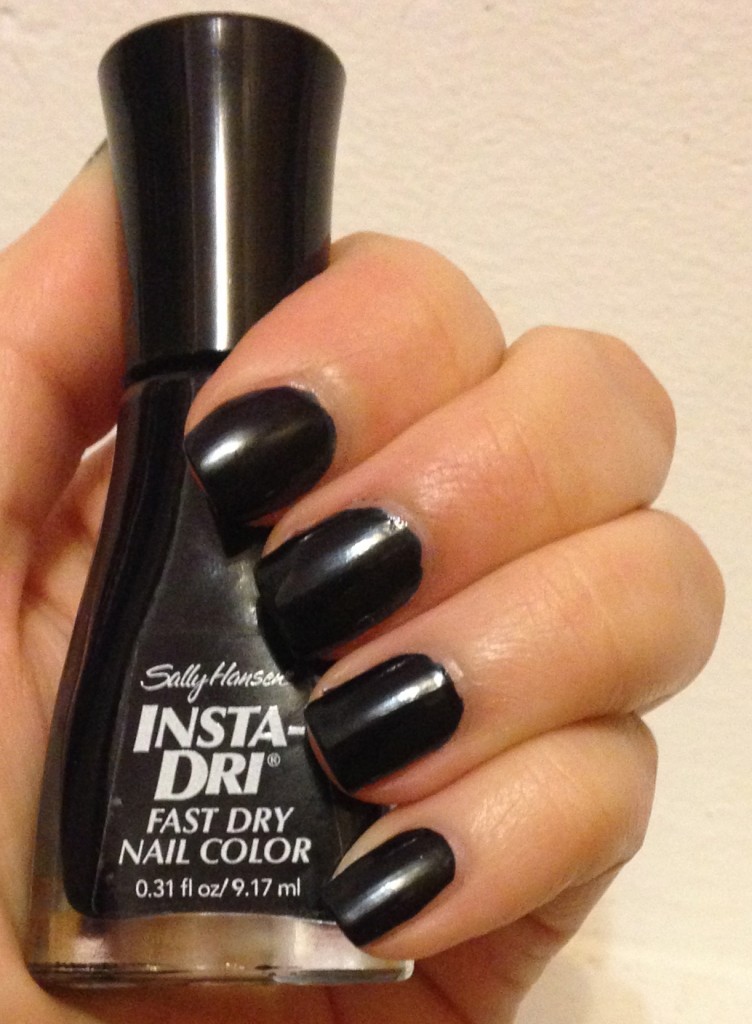
I began with Sally Hansen Insta-Dri in Night Flight, a dark blue polish that looks almost black. Night Flight has a perfect formula that is opaque in two coats. The fast-drying formula is also perfect for a geometric manicure because I am too impatient to wait for anything else to dry. After about five-ten minutes, I was ready to grab the scotch tape and get to glittering!

  IMG_3413

IMG_3416

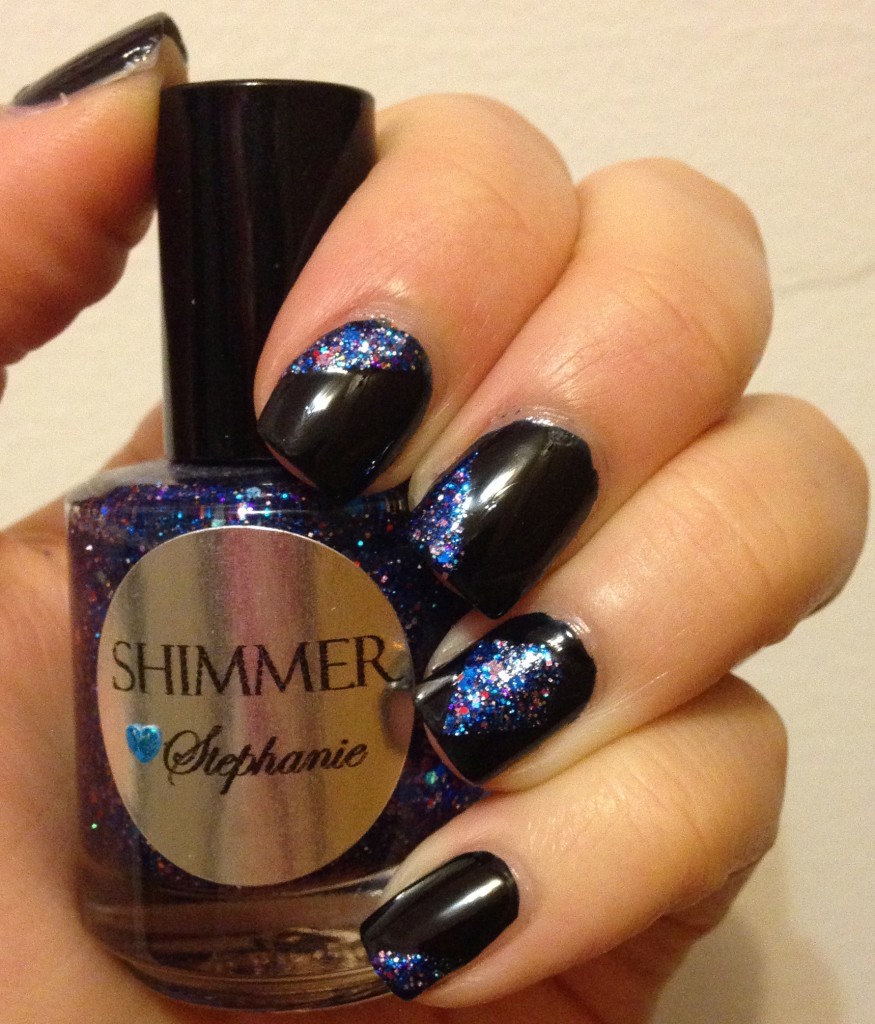
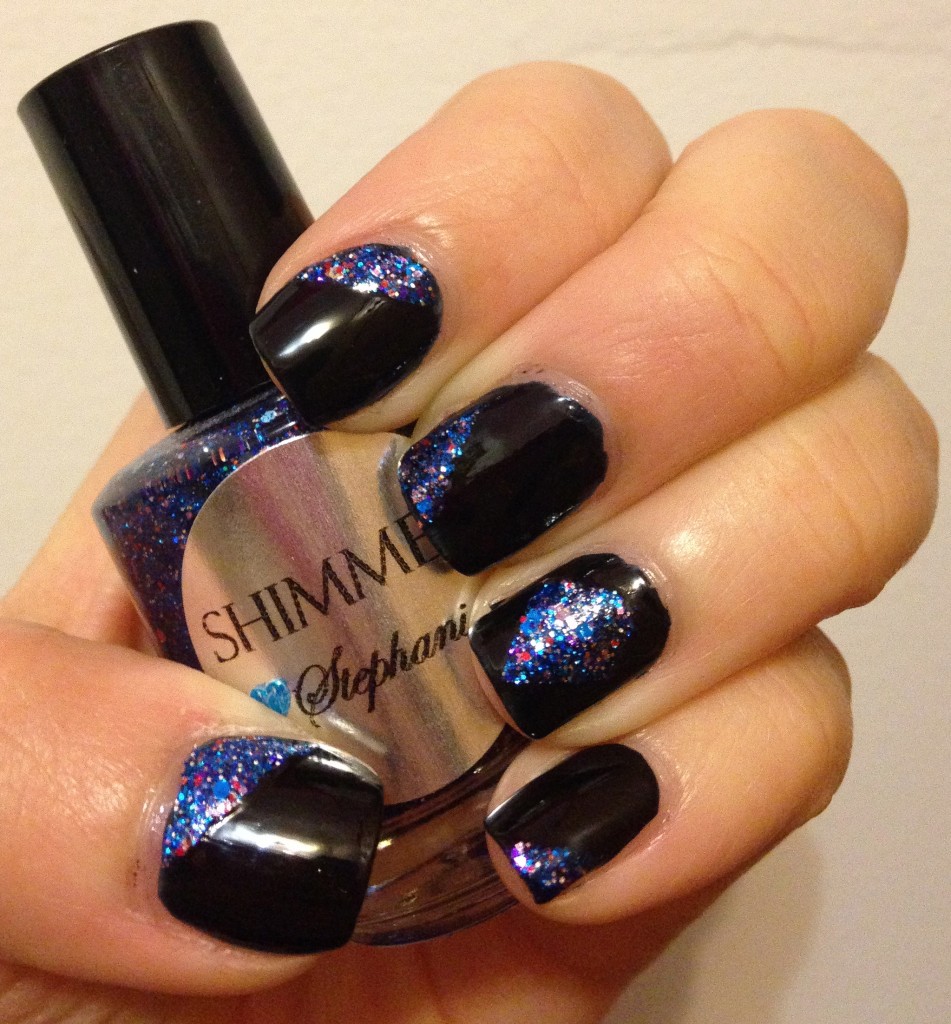
To create a geometric look, I decided to place a diamond on my ring finger as an accent, and then rotate triangles on my other nails. All you need is tape to achieve this look! Simply place the tape where you want the design to be, apply your glitter polish, and peel off the tape while the polish is still wet. I used Shimmer Polish in Stephanie since the colors really complimented Night Flight. Plus, Shimmer Polishes are quite densely packed, so I knew the glitter would be opaque!

  IMG_3417

As a final touch, I added a matte top coat to my manicure. I just love the look of matte glitter! It really makes the glitters pop, and it makes the color portion look like vinyl. I used butter LONDON Matte Finish, but any matte top coat will do! Of course, you can use a glossy top coat if you prefer. And that is my complete geometric glitter manicure for fall! This nail art technique is so easy to create, and you can customize it to your own tastes by using different colors, glitters, and designs. The possibilities are endless! If you liked this look, please head on over to my blog Adventures in Polishland for everything nail polish and beauty. I would love to see you there!

_________________________________________________________________________________

Thank you again, Christina, for taking over my blog for the day!  Wow, that is a suuuuuper cool look  that I think I could actually pull off!  You guys know me and my lack of artistic tallent, but this is super pretty and seems like it wouldn't be too difficult to do!  Make sure you go follower Christina at Adventures in Polishland!

The Great Pumpkin Massacre!!!

Every time I think of this polish's name, all I can think about is Charlie Brown...  But like, evil Charlie Brown.

(Source | Source | Source | all frankensteined together by yours truly)

Yeah, don't you wish your photo splicing skills were as L337 mine.  I'm dying over here...  Beyond ridiculous.  Ahhhhh, must focus!!!  Tonight's polish is anything but ridiculous - Model City Polish The Great Pumpkin Massacre.  TGPM will be available TOMORROW HERE at 12:00 pm cst.  SO BUY IT, guys.  Seriously.  It's fantastically amazing.  Want to see why?  Good:


*I was not financially compensated for this post. I received a sample of The Great Pumpkin Massacre for review purposes.  All other polishes in this review were purchased by me for my own use.  The opinions are completely my own based on my experience.  For more information, please see my Disclosure Policy in the tab above.* 


Color: Clear base with orange and black hexes that are both metallic and holographic!


Finish: Glitter Top Coat – glitter in a clear base to be worn as a top coat.
Bottle / Brush: Round bottle – the brush and wand are the standard width and length.  Easy to control and manipulate.


Opacity: Glitter topcoat – not designed for full opacity.


Glitter Application: Easy – Spreads evenly without much manipulation.


Consistency: Medium – applies easily and doesn’t flood the cuticles.
Overall Ease of Application: Easy – applies well without pooling, dragging, streaking, or balding.  Spreads evenly and smoothly.  However, if you want a busier look, you'll need to use the dab method.  Otherwise, it'll be sparse, which is also really pretty.


Stampability: Not designed for stamping.
Dry Time: Quick – dry to the touch without smudging in under 3 minutes.


Overall Thoughts:  I have loved every single one of Nina's blends that I have tried.  She truly makes an amazing product, and I hope every single one of you will go and buy her stuff.  TGPM is from her fall trio that will be available tomorrow.  Like the rest, it is scented, but you can request unscented if you'd like.  This one smells like pumpkin bread!  I'm really digging her scents.  They aren't so overpowering and chemically that they make you want to rip your hands off (*cough cough color club winter affair cough cough*).  Instead, it's a delightful scent that you catch only when you have your hands near your nose.  Application for TGPM is great!  It can be worn sparse or dense depending on your mood and will be perfect for Halloween - my personal favorite holiday!  Here, I've worn it over Liquid Lacquer's Stick a Fork in Me, a nude holo with orange flash, and China Glaze Riveting, an orange shimmer.  I think I like it better over the nude, but I bet it would look even better over white, which is how I plan to wear it at Halloween!

And now, let's take a look at the freebie!  If you purchase the entire fall trio, you will receive a 5ml cuticle oil!  You can choose between candy corn scented or unscented.  


I love this oil!  In the top photo, you see my poor hands and nails after removing my soak off gels.  Completely ravaged by my acetone (no, I will not stop using it), hey look so dehydrated and sad.  Then, in the middle picture, you can see where I applied the oil oh so sparingly, hah!  Yes, I drenched my hands in oil.  I'm not ashamed...  In the final pic, I took a pic of my phone stop watch to show you exactly how long the oil takes to be absorbed into your skin.  10 mintues is about average for my crazy dry skin.  The oil leaves my cuticles feeling soft and happy while having a killer scent that makes me want to nom my fingers!  (You may need to click on the photo to enlarge it.)


You can purchase Model City Polishes at Nina's Etsy store.  Follow Nina and Model City on Facebook and Instagram for news and updates on her collections.  Don't forget, the restock is tomorrow at 12 pm cst, and if you order the trio, you get the cuticle oil for free!

*I was not financially compensated for this post. I received a sample of The Great Pumpkin Massacre for review purposes.  All other polishes in this review were purchased by me for my own use.  The opinions are completely my own based on my experience.  For more information, please see my Disclosure Policy in the tab above.*

KBShimmer You Autumn Know and You Go Ghoul!

Ok, let's just get this out of the way because I know you're all thinking it...


Now that we've relived the 90's a little (or at least those of us old enough to have been alive in the 90s, hah!), let's get to the review!  Tonight, we're going to take a look at two polishes from KBShimmer's upcoming fall collection.  These polishes will be available on September 1st, so make sure you have that in your calendar!


*I was not financially compensated for this post. I received a sample of KBShimmer You Autumn Know and You Go Ghoul for review purposes.  All other polishes in this review were purchased by me for my own use.  The opinions are completely my own based on my experience.  For more information, please see my Disclosure Policy in the tab above.*

You Autumn Know


Color: White crelly with orange, purple, and gold hexes and bars.


Finish: Glitter Crème – glitter in a crème base.

Bottle / Brush: Round bottle – the wand is the standard length, but the brush is much thicker.  This made the polish easier to control and manipulate than even the normal brushes for this bottle type.


Opacity: High – opaque at two coats!

Glitter Application: Easy – Spreads evenly without much manipulation.


Consistency: Medium – applies easily and doesn’t flood the cuticles.

Overall Ease of Application: Easy – applies well without pooling, dragging, streaking, or balding.  Spreads evenly and smoothly.


Stampability: Not designed for stamping.

Dry Time: Medium – dry to the touch with minimal smudging in 3-8 minutes.


Overall Thoughts: I paired YAK with Cult Nails Tempest on all but my middle finger, which is two coats over itself.  Yes.  That is only two coats.  Yes it's completely opaque in two coats.  That's definitely not the norm for white crelly glitters since you need the base to be transparent enough to see the glitters.  I think that Christy balanced the opacity to glitter viewability very well.  It has more depth layered over itself, but it's brighter and more polished when layered over Tempest.  The glitters were easy to get out of the bottle, and the micro bars weren't a pain to place or cover with topcoat.  No poking up here!  All in all, it's a very pretty crelly, and it needs to be in your collection as it's the perfect embodiment of crunchy leaves underfoot.

You Go Ghoul


Color: Black jelly base with purple, orange, and fuchsia hexes and bars.

Finish: Glitter Jelly – glitter in a colored jelly base.


Bottle / Brush: Round bottle – the wand is the standard length, but the brush is much thicker.  This made the polish easier to control and manipulate than even the normal brushes for this bottle type.

Opacity: Medium – achieves opacity at three to four coats.


Glitter Application: Easy – Spreads evenly without much manipulation.

Consistency: Medium – applies easily and doesn’t flood the cuticles.


Overall Ease of Application: Medium – applies well with minimal pooling, dragging, streaking, or balding.  Spreads well without much manipulation.

Stampability: Not designed for stamping.


Dry Time: Medium – dry to the touch with minimal smudging in 3-8 minutes.


Overall Thoughts: Again, I paired YGG over undies, Cult Nevermore, which took a bit of depth away.  I still liked it over one coat, though, as you can see the glitters a little more easily.  Again, this polish has micro bars, but they really aren't noticeable on the nail or during application.  The glitters were easy to get out, and they spread well on their own.  There are a few that look like they're curling, but I assure you that they do lay flat on the nail without any flipping, fussing, or extra top coat.  This particular polish feels soooooooooo Halloween to me, so I just had to pair it with an orange I've been wanting to try - Elevation's Llulluillaco, which is a small batch prototype I scored from one of her 22nd of the month restocks.  I think it probably would've looked better with Elevation Sarychev, but I still really like the look of these two together.  Now that I've had these on my fingers for the past couple of days, I'm definitely ready for fall!

You can purchase KBShimmers at their online store for US customers and Harlow and Co for international customers.  Follow Christy Rose and the gang on Facebook, Twitter, and Instagram.  Remember, they're going to have a MASSIVE giveaway once they hit 10,000 FB followers, so get to liking!  :D 


*I was not financially compensated for this post. I received a sample of KBShimmer You Autumn Know and You Go Ghoul for review purposes.  All other polishes in this review were purchased by me for my own use.  The opinions are completely my own based on my experience.  For more information, please see my Disclosure Policy in the tab above.*

Gold Chain Born Pretty Store Review

Remember my chain nail art tutorial? Well that's a 2D look that you can get with any two colors.

But if you want the true chain effect and you really want it to pop off your nail, then you might consider getting an actual chain to attach to your nails!


Born Pretty Store (BPS) offers several varieties of chains, and today I'm reviewing the 1.6mm gold chain for you!

This chain is 100cm long (about 40 inches), and quite small (1.6mm), running at $2.99 (and their always-free shipping). Use my coupon code, C10X31, for 10% off!

The chain comes in a teeny ziplock bag, but it doesn't come out all tangled like necklaces tend to be.

To apply it to your nails, I recommend using a dab of nail glue, at least on the ends of the chain. To place it, apply it to still-wet nails (I prefer to apply it to the top coat layer rather than the polish layer) so you can position it properly. When it has dried, to being almost tacky, carefully lift the each end with tweezers and dab a bit of nail glue. This will keep your chain in its position, but you can always use more glue if you plan on roughing up the design. And let's face it...this kind of look is begging to be roughed up a little. Rawr!

I'm obsessed with letting the chains hang off my nails in different ways like I've done for this look. It's odd, and not necessarily appropriate for all occassions, but damn...it's awesome!

The colors I used for this look included Sun of a Peach (China Glaze) and Stranger Tides (OPI) with lines of Black Onyx (also OPI). I also did some cutouts of my bare nail.

Which finger do you like the most? How would you wear chains? I've seen some fabulous designs, including Sammy's looks, Lexi's take, and Whitney's! I have another review of a silver look coming soon too.

Thanks BPS for the chains!

Pick your's up here, and don't forget to use the coupon code for 10% off.
 

These products were sent to me by Born Pretty Store. The reviews are based entirely on my experience with the products and were in no way influenced by anyone.

Jindie Week: Day 4 - Guns and Roses

Today's Jindie takes a step in a different direction. Instead of a light, fluffy, feminine crelly, tonight's post is a vampy shimmer that's sure to make you stare at your hands for hours - Jindie's Guns and Roses.

*I was not financially compensated for this post. I received a sample of Guns & Roses for review purposes.  All other polishes in this review were purchased by me for my own use.  The opinions are completely my own based on my experience.  For more information, please see my Disclosure Policy in the tab above.*


Color: Black base with pink to blue shifting shimmer, hexes in various sizes and shades of pink, and light pink dots


Finish: Glitter Shimmer – glitter in a base that shimmers in the light.
Bottle / Brush: Squat mini bottle with slender cap - The squat round bottle makes holding it easy while the cap is long enough to hold without any problems.  The wand and brush are longer than your average mini, which makes getting the goodies at the bottom a little easier.


Opacity: Medium – achieves opacity at three to four coats. Here, however, I have layered one coat over Cult Nails Nevermore, a one coat black polish that I absolutely love.


Glitter Application: Medium – requires the dab method, but spreads evenly.
Consistency: Medium – applies easily and doesn’t flood the cuticles.


Overall Ease of Application: Medium – applies well with minimal pooling, dragging, streaking, or balding.  Spreads well without much manipulation.


Stampability: Not designed for stamping.


Dry Time: Medium – dry to the touch with minimal smudging in 3-8 minutes.


Overall Thoughts: The shimmer in this polish is INTENSE. Actually, that may even be an understatement. Holy crap, you guys! The shift from pink to purple to blue is nothing short of stunning. Plus, I love the varying shades of pink glitters giving the polish depth despite the fact that I only used one coat. I was afraid that the shimmer would be way too overpowering if I did several coats, so I chose to use one coat over Cult Nails Nevermore. I'm actually glad I did it this way as it's not too busy, which would detract from the beauty of the polish. Application was a breeze, but it did require a little more cleanup than the other Jindies I've shown you this week. While the consistency was fine, it wasn't as easily controlled as the crellies. Keep in mind, though, that I'm talking about my own user error. Otherwise, Guns & Roses is a very pretty shifting shimmer with a delicate mix of hot and pale pink glitters.

You can purchase Jindies at her store here. You can also purchase Jindies from her stockists Llarowe, Mei Mei's Signatures, Ninja Polish, Harlow & Co, and Femme Fatale. Follow Jen from Jindie on Facebook, Twitter, and Instagram.

*I was not financially compensated for this post. I received a sample of Guns & Roses for review purposes.  All other polishes in this review were purchased by me for my own use.  The opinions are completely my own based on my experience.  For more information, please see my Disclosure Policy in the tab above.*