Showing posts with label OPI. Show all posts

Hot pink!

So, I know it's the middle of winter and everyone is doing holiday colors, but I was in the mood to show you guys a gorgeous hot pink.  Let's take a look at my first Limited Edition Lynnderella that I purchased myself instead of receiving it as a gift: Don't Drink this Pink.

*I was not financially compensated for this post.  All items in this review were purchased by me for my own use.  The opinions are completely my own based on my experience.  For more information, please see my Disclosure Policy in the tab above.*


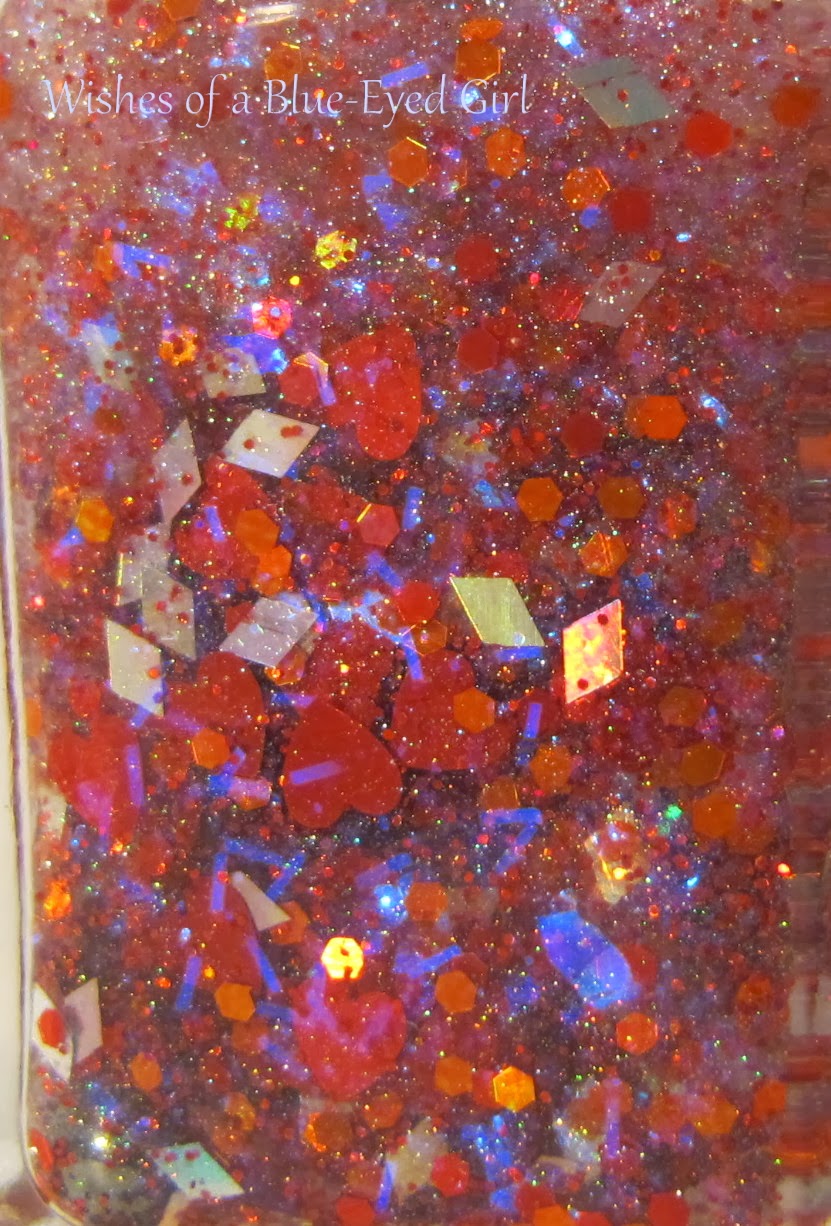
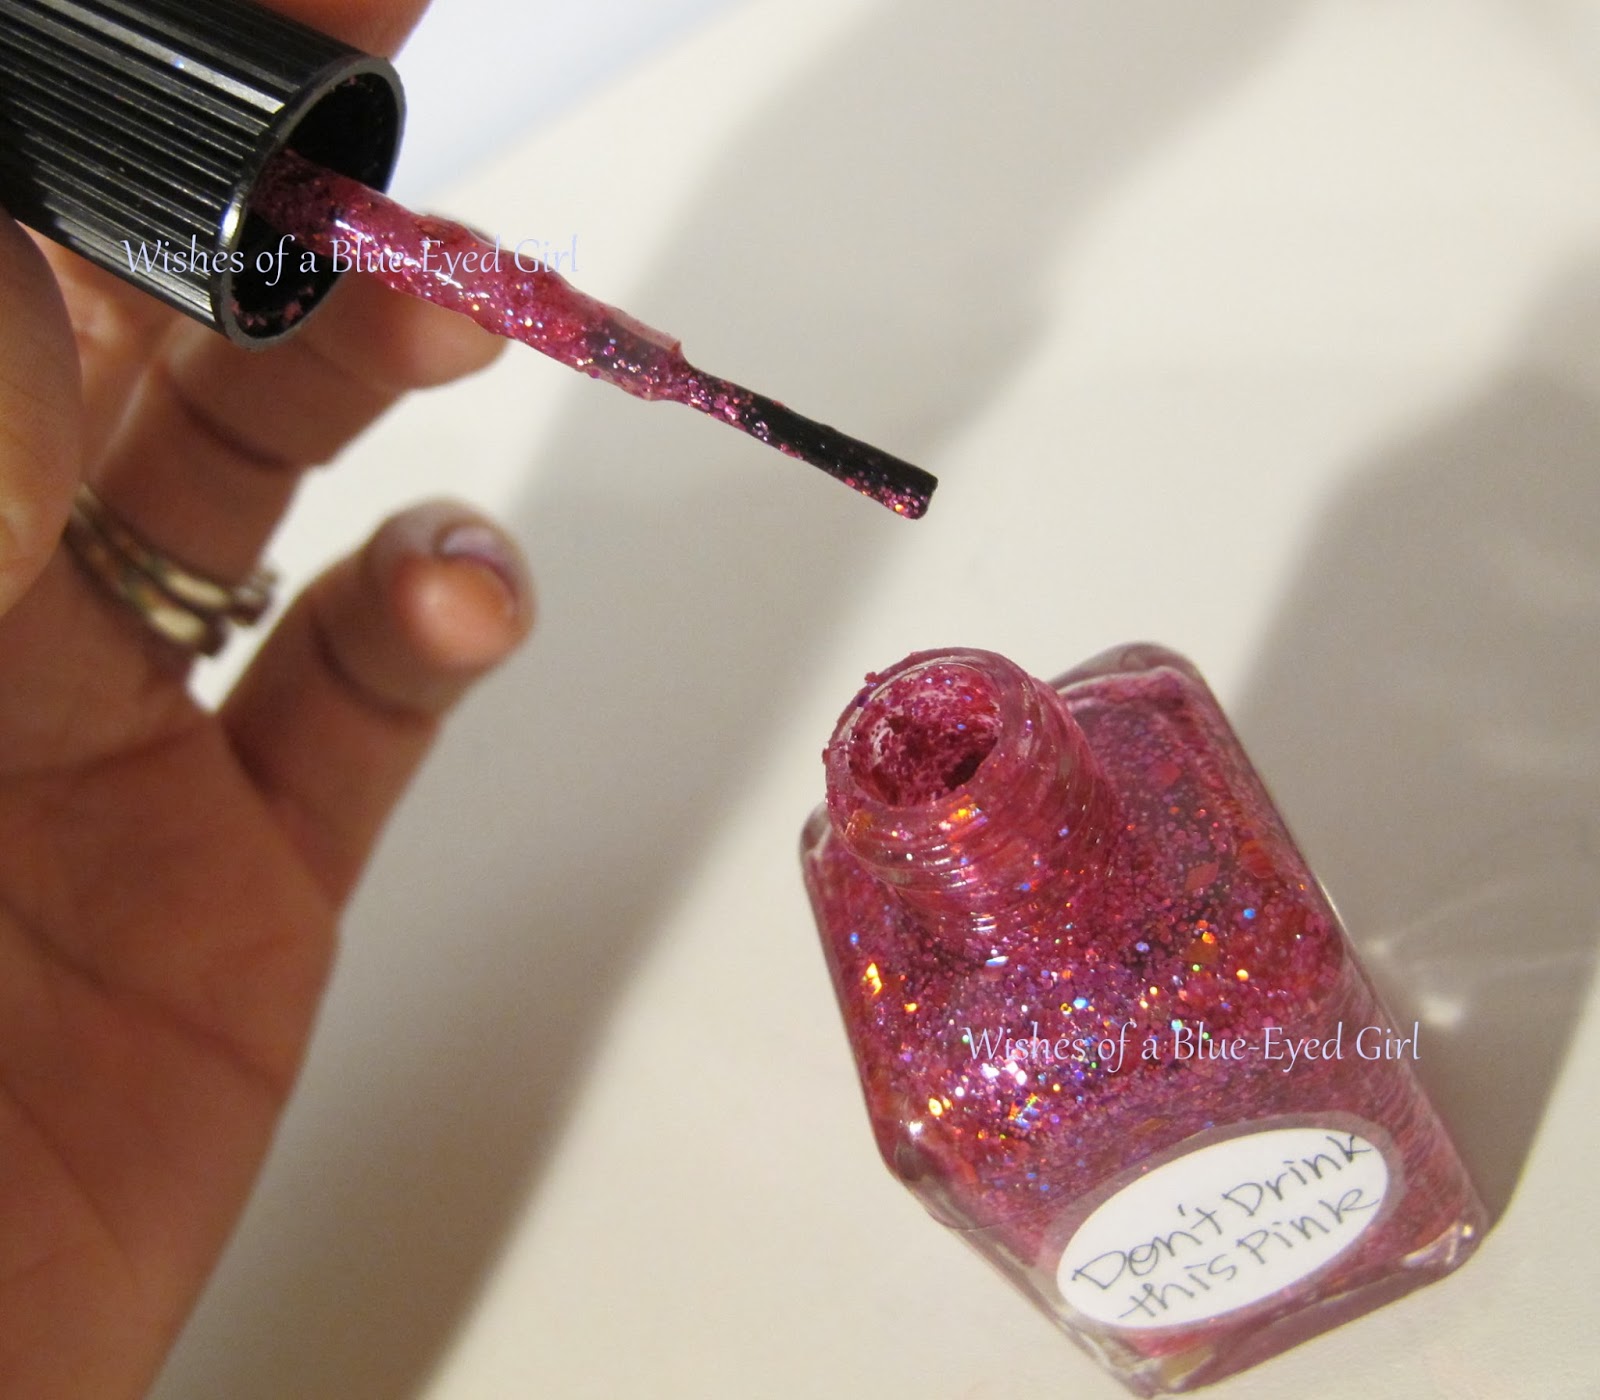
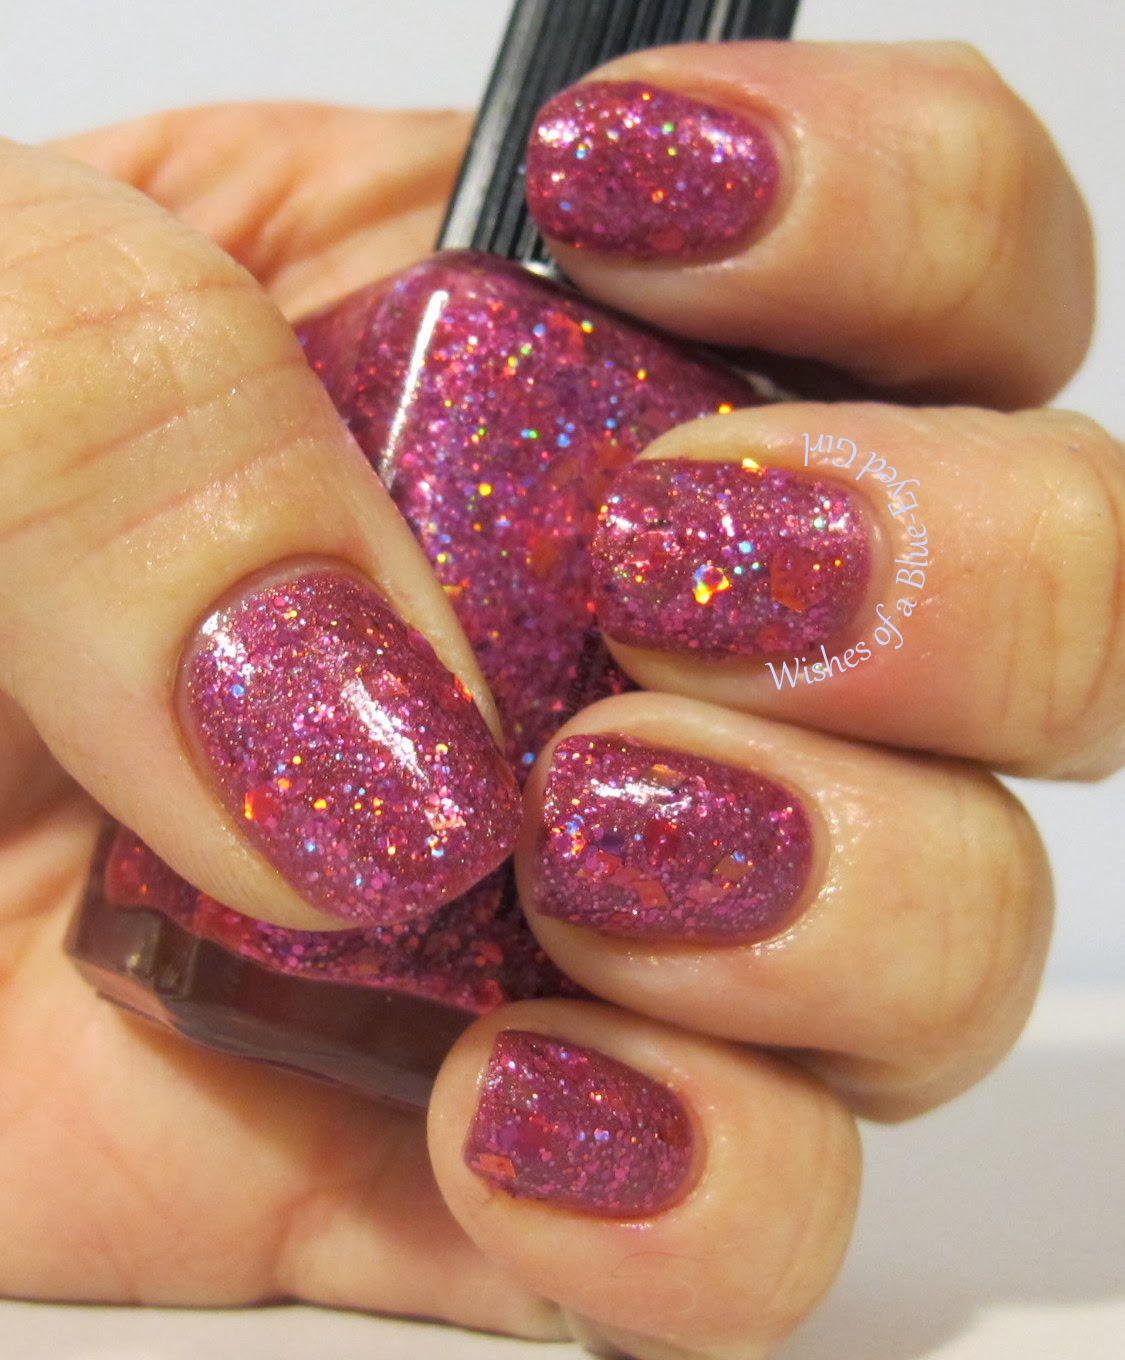
Color: Hot pink glitter jelly with hot pink holographic glitters.
Finish: Glitter Jelly – glitter in a colored jelly base.


Bottle / Brush:  Rectangle bottle – ribbed cap that is a little hard on the hands to open if you have sensitive skin.  The wand is the standard length, but the brush is a little too thin to pick up large / shaped glitter without fishing.  The brush's width is also an issue for spreading.  It doesn't fan out and pretty much requires you to dab polishes that are densely packed with glitter.


Opacity:  Medium – achieves opacity at three coats, but here I've worn one coat over OPI DS Signature which is a bright pink linear holographic.
Glitter Application: Medium – requires the dab method, but glitters are easy to extract and spread evenly.


Consistency: Thick – thick or it can be clumpy, but is easily remedied with some polish thinner.
Overall Ease of Application: Medium – applies well with minimal pooling, dragging, streaking, or balding.  Spreads well with the dab method.


Stampability: Not designed for stamping.
Dry Time: Quick – dry to the touch without smudging in under 3 minutes.


Overall Thoughts: Holy crap you guys.  This polish is just so INSANELY packed full of hot pink glitters that it just gobbed on super easily, but it's definitely one of those polishes that requires the dab method.  I was able to get the larger glitters out easily despite the brush being thin.  I did leave it upside down for a while before applying.  It's a perfect pairing with DS Signature, too.  The base color and the color of the glitters are exactly the same shade of vibrant pink.  The only thing that makes me sad about this mani is the fact that you can't really see the in your face holo of Signature.  This polish is a MASSIVE topcoat eater, so make sure you either use a generous coat of Gelous, Glitter Food, or Glitter Tamer before putting on your topcoat.  


Sadly, this LE has been discontinued, but you may occasionally find one on a blog sale.  If you do, you need to snap it up as quickly as possible.  It's just.  that.  good.  Seriously.  I purchased my OPI DS Signature on a dusty hunt from a local salon that was a treasure trove of amazing old polishes.  You can purchase Lynnderellas at their store here.  Follow their fan-run FacebookTwitter, and IG pages.

*I was not financially compensated for this post.  All items in this review were purchased by me for my own use.  The opinions are completely my own based on my experience.  For more information, please see my Disclosure Policy in the tab above.*

Black Friday Relief Nail Polish Giveaway!

Black Friday's on Friday. It's already rearing its ugly head, as eager buyers pitch tents outside of Best Buy hoping to snag the best deal on the best devices.

It's chaos, confusion and madness in the stores, and if you've ever braved it, you're unlikely to try again.

So until Friday, I will be hosting a Black Friday relief giveaway. I'm bringing the deals to you in the best way possible.

I've put together a care package worth over $200 retail value, full of my favorite colors, treatments, and some other holiday goodies!

Here's a look at the goodie bag, that you can enter to win!


Learn how to enter and get all the details on the prizes after the jump. Trust me, you don't want to miss this giveaway!


The Prizes

The first of the prizes is a rainbow of my favorite colors from Zoya and OPI.


There are also four non-rainbow colors, including a white, off-white, holographic black, and silver glitter.


I've also packed in five Finger Paints flakie polishes that are no longer sold in stores anywhere. I've been saving these for a special occasion and now's that time!

While these colors don't look like much in the bottle, check out Scrangie's review of them for an idea of how they can be used:

Image courtesy of Scrangie (www.scrangie.com)

And here are some micro pics for your viewing pleasure!


Another oldie but goodie collection is this 2011 Color Club Collection, Beyond the Mistletoe. Just in time for the holidays!

Image courtesy of Scrangie (www.scrangie.com)
And again, some micro shots.


I really love this collection!


I'm also putting in two of my favorite treatments, CND Cuticle Oil and OPI Nail Envy. And some yummy smelling Avojuice lotions.

Finally, last but definitely not least is the treasure in the chest. This 18K white gold top coat from OPI, called Pure. This is brand new this season!


So that's the prize package! Worth it right? And what a nice relief from the horrific holiday madness!

SO HOW THE HELL DO I ENTER?!

Simple. I want to thank everyone for following me, and for spreading the word about Nailed It, so there are a bunch of entry options below. Simply fill out the Rafflecopter form provided with your complete and correct information.

Please note that there are some restrictions, so make sure you meet these below before you enter!
  • Contest begins tonight at midnight and ends on Monday, December 2 at 12:00 AM.
  • You must be 18 or older or obtain your parents' permission.
  • International giveaway this time! Open to all!
  • You must respond to the announcement of winning by Friday, December 6 at 5:00 pm MST. I will email the winner directly. If the winner does not respond, a new winner will be chosen.
That's it everyone! Good luck and thank you all for your continued support!

a Rafflecopter giveaway

Enchanted Polish Tenderheart

Today has been a super busy day of making polishes and working on blog stuff.  I'm super excited to announce that my polish line's November Duo is up in the shop for preorder.  Go and check those out here!  There will be a proper restock of the duo as well as everything else in my store (minus the Nail Polish Frights collections) on 11/18.  If you order your polishes now, though, you can get free shipping on orders $20 and over by using the discount code NOVEMBERFUN.  So, get on over there if you've been looking to try my polishes out!

Tonight, let's take a look at Enchanted Polish Tenderheart worn over OPI Liquid Sand The Impossible.


*I was not financially compensated for this post.  All items in this review were purchased by me for my own use.  The opinions are completely my own based on my experience.  For more information, please see my Disclosure Policy in the tab above.*

Color: Clear based polish with iridescent shreds, silver holo diamonds, red holo hearts, and various sizes of red hexes.
Finish: Glitter Top Coat – glitter in a clear base to be worn as a top coat.


Bottle / Brush: Rectangle bottle – The wand is the standard length, but the brush is a little too thin to pick up large / shaped glitter without fishing.  The brush's width is also an issue for spreading.  It doesn't fan out and pretty much requires you to dab polishes that are densely packed with glitter.


Opacity: Glitter topcoat – not designed for full opacity.
Glitter Application: Hard – difficult to dig the glitters out of the bottle, spreads well with the dab method, but pools at the cuticles and bubbles when dry.


Consistency: Super thin – runny and floods the cuticles easily.
Overall Ease of Application: Hard – applies with some pooling and bubbling.


Stampability: Not designed for stamping.
Dry Time: Long – dry to the touch with minimal smudging in over 8 minutes.


Overall Thoughts: As much as I wanted to love this polish, it was kind of a pain in the butt to apply.  The base to glitter ratio was way off meaning that there was much more base than there was glitter creating a very sparse look on the nail.  If I wanted to get enough glitter on my nail, I either needed to use several coats or attempt to load up on glitters in one coat, which caused pooling and bubbling.  Stupidly, I went with option two and gobbed one super runny layer onto the nail, which took forever to dry...  Otherwise, I really liked this combination.  The bright pink undies worked really well with the red glitters.  I also like how easily you can see the iridescent shreds, which were my favorite part of the polish.  It was surprising how well it went over the liquid sand texture, but I do wonder if that attributed to the long dry time.  Either way, though, this combo is quite pretty.

Sadly, Tenderheart and the rest of the Love A Lot Glitter collection have been long discontinued.  You can still find them on blog sales and ebay, though, if you're in the market!  Purchase other Enchanted polishes at her store.  Follow Chelsea on Facebook and Instagram for news and updates on new releases.

*I was not financially compensated for this post.  All items in this review were purchased by me for my own use.  The opinions are completely my own based on my experience.  For more information, please see my Disclosure Policy in the tab above.*

Comparison Thursday: Dusty Pink Cremes

Tonight's Comparison Thursday is going to be a simple one - dusty pink cremes.  When I bought OPI Dulce de Leche I thought, hmmm, this seems familiar...  I got it home and took a look at my stash and immediately spotted a polish that was just so close in the bottle that I just had to compare them.  So, I present to you OPI Dulce De Leche versus China Glaze Dress Me Up.


In the bottle, they both look just so similar.  Dress me up is just a hair darker in the bottle than Dulce de Leche.


The bottles and brushes, however, are extremely different.  I vastly prefer the shape of the OPI bottles over the China Glaze bottles.  They're easier for me to hold onto.  As you can see in the photos below, the OPI Pro-Wide Brush is significantly thicker than the China Glaze standard brush.  Application with the Pro-Wide Brush is a little tricky for those with smaller nail beds, but pretty nice for those with larger and longer nails.  The China Glaze brush is a lot thinner, but this polish was so easy to apply that a thinner brush wasn't a problem.


The polishes are vastly different on the nail.  In the bottle, they look pretty similar, but on the nail Dress Me Up dries quite a bit darker.


Dulce de Leche applied like most OPI cremes.  A bit streaky the first coat with a tendency of pooling at the cuticle but building nicely in two to three coats.  Dress Me Up was amazing to work with.  It is a one coater. I LOVE when polishes go on perfectly in one coat!


Here's another shot of them together.  I ended up keeping Dress Me Up and selling Dulce De Leche because I didn't see the need to keep both, and, honestly, why wouldn't I keep the one coater?!


The highly pigmented nature of Dress Me Up made it work great with stamping!  I love the monochromatic look for stamping, and these two were perfect for that.  I think it would've worked better had I applied my Orly Bonder before stamping (pro tip - sticky base coat over top coated undies helps the image transfer from the stamp!).  You can see my review of these two stamped in my guest post for Color Me So Crazy here.


Unfortunately, Dress Me Up was from the Hunger Games collection that came out last year, so it is discontinued.  However, you can often still find it where China Glaze polishes are sold, at salons, or on blog sales.  As far as I know, OPI Dulce de Leche is still available in the OPI core line.  

So the question remains, which do *you* like better?

Happy Halloween Everyone!!!

If you didn't know, my store is having a sale right now, and since I'm a dumb dumb that doesn't understand that technology stuff, the fixed code will be up until midnight tomorrow night.  All orders will receive 13% off with the promo code "Halloween" - so click here to order!  Also, there are only a few more hours to get your donations in to I Need a Lighthouse (or you can send them to me via paypal if you'd rather).  More information on that is located here, here, and here.

Ok, we won't be doing a Comparison Thursday today since it's Halloween, which is my FAVORITE holiday of the year.  Instead, I'm going to show you some of the Halloween looks I've been rocking this month.  Bear with me as these photos were taken with my iPhone and might not be the best quality coupled with the fact that my nails are a right mess. Without further ado, and in no particular order, my Halloween manis!

**All polishes were purchased by me.**

Lynnderella Are You a Good Witch over Rescue Beauty Lounge Piu Mosso.


Witch is a clear based polish with a blue shimmer and glitters in all sorts of shapes and sizes but that focus more on the darker side of the spectrum.  Part 1 of the Lynnderella Halloween inspired Twin Set.  Piu Mosso is a deep navy creme with a strong copper shimmer.  

Lynnderella Ghouls Just Want to Have Fun over Wet 'n Wild Fantasy Makers Darkest Hour, Once Upon a Time, and Ghouls Rush In.


Ghouls Just Want to Have Fun is a clear based polish with a pink to blue shimmer and multicolored glitters.  Part 2 of the Lynnderella Halloween inspired Twin Set.  Darkest Hour is a plain black creme.  Once Upon a Time is a silver foil.  Ghouls Rust In is a really nice bright orange jelly.  

Lynnderella Gotta Love Brains with Illamasqua Raindrops.


Raindrops is a grey based polish with silver-grey flakies.  Gotta Love Brains is a pale grey base with a pink shimmer and hexes and squares in silver, purple, pink, and blue.  This is two coats of Raindrops and three coats of GLB without undies.  I wasn't sure how I'd like either of these, but this may be my favorite non-art mani this year.

Lynnderella All Hallows Eve over Elevation Torres del Paine.


All Hallows Eve is a green polish with various shades and sizes of green and black glitters.  Torres del Paine is an amazingly luscious green creme that is opaque in one coat.  Flawless application!  I took it to the next level by using NYC Matte me Crazy.

Orange Gradient


I used 5 different polishes following this technique to get this look.  I was absolutely IN LOVE with this mani.  It's just sooo pretty.  I used (from cuticle to free-edge): Elevation Matsuda, Deborah Lippmann Footloose, China Glaze Riveting, Elevation Sarychev, and Elevation SBP Llulluillaco.

Candy Corn Holo Gradient


I used the same technique as the one above for the gradient (from cuticle to free-edge): Model City Polish Corn Maze, OPI Coral Reef, and Indigo Bananas Do You Have a Flag?  I then stamped on my accents with Konad Special Black using my new Bundle Monster Holiday plates (BM-H07, BM-H06).

So, if you celebrate it, what did you do for Halloween?  If not, what was your Thursday mani?  I'll be doing something a bit different next month, so check back tomorrow for that.  Also, please be aware that the Depression Awareness Giveaway will take time to verify as I will be awaiting the information from the charity, so please be patient as I get all of the verification information in.

**All polishes purchased by me.**

Oldie but Goodie: OPI Liquid Sand The Impossible

Ok, I'm going to be dredging up a lot of photos that I took a loooooong time ago for the next month since I won't be painting my nails as often.  Some of these are from back before I moved in May, so there will be a different lighting scheme going on.  And of course, my nails were much longer and healthier back then for sure!  Either way, I hope that you don't mind the older photos, which also means older polishes, as I work through my No Polish November.  More details on that and a giveaway for those participating in the challenge will be up later this week.  Also, don't forget to get your donations for I Need a Lighthouse for my Depression Awareness Giveaway by 10/31!  Check out the info on what do do here, here, and here for instructions on how to pay with PayPal if you'd rather do that.  Ok, let's get into some polish, shall we?!

Tonight, let's take a look at OPI Liquid Sand The Impossible.  I have the mini bottle, which has a few distinct differences from the larger bottle.  Let's take a look!  Photos are with and without topcoat in indoor lighting.

*I was not financially compensated for this post.  All items in this review were purchased by me for my own use.  The opinions are completely my own based on my experience.  For more information, please see my Disclosure Policy in the tab above.*


 Color: Bright hot pink with small and medium hot pink hexes.  Leans more red/orange when topcoated.


Finish: Textured – a polish designed to be worn without a topcoat and to have a rough finish once dry.  Finish is gritty and almost sand-like.


Bottle / Brush: OPI Mini bottle – designed as a miniature version of the larger bottles.  The shorter handle and wand make it hard to handle.  The brush is also not as wide as the new pro-brush.


Opacity: Medium – achieves opacity at three coats.  First coat is streaky, but builds well with subsequent coat.  Here, I've done three coats to ensure full coverage for photos.
Glitter Application: Easy – Spreads evenly without much manipulation.


Consistency: Medium – applies easily and doesn’t flood the cuticles.
Overall Ease of Application: Medium – applies well with minimal pooling, dragging, streaking, or balding.  Spreads well without much manipulation.


Stampability: Not tested for stamping.


Dry Time: Long – dry to the touch with minimal smudging in over 8 minutes.  This is my only problem with this polish.  It takes FOREVER to dry.  I think part of that is due to the fact that I'm used to instant gratification with quick dry topcoats, and Liquid Sands are typically worn without a topcoat.  It's not a deal breaker, but it wasn't awesome when I dinged it pretty badly 15 minutes after painting.


Overall Thoughts:  The first thing you'll notice is that the mini bottle's brush is a lot thinner than the standard bottle's wide brush.  Couple the thin brush with the smaller handle, and you get a bottle that's relatively more difficult to handle.  While that was irritating for sure, it didn't completely kill my opinion of this polish.  The second thing you'll notice is that the mini bottles don't contain the cute stars that are in the full sized bottle.  Now that made me sad.  When I started seeing swatches with the stars in it, my heart sank.  I totally would've gotten the big bottle if I had known it had stars that weren't present in my mini!  Ahh well.  C'est la vie!  Otherwise, I really enjoyed this polish.  Dry time was a huge miss for me, but the fact that it's textured means that you couldn't tell that I dinged pretty badly on my ring finger since I was able to manipulate the polish to cover the ding.  Boooyah!  I also really enjoyed this polish with a topcoat.  Tomorrow, I'll show you what it looks like with a glitter topper.  Hint hint: it's hot.

This polish came out last year, but you should still be able to find these where OPIs are sold.

*I was not financially compensated for this post.  All items in this review were purchased by me for my own use.  The opinions are completely my own based on my experience.  For more information, please see my Disclosure Policy in the tab above.*