I had a request for a tutorial on working with dried flowers, and I'm happy to report I've finally managed to pull it together!
There are two main kinds of dried flowers you'll find when you buy them for nail art:

On the left is a single pressed flower, and on the right is a group of little flowers that look like spokes on a wheel. The main difference here in my opinion is that I like the way the single flower looks as is, but I don't want to work with the 'spoke' flower as is, I want to work with the individual flowers in the cluster.
The simple, easy way to work with dried flowers is to apply topcoat to your mani and simply lay them on the topcoat; finish or not with another layer of topcoat as needed. In my opinion, this only really works well if you are working with the single flower type on the left; things got a little bit more tricky for me when tried to work with the spoke flower either as a whole or when I split it up. The problems are that if you have multiple pieces, your topcoat is going to dry faster than you want it to in order to allow you to adhere the flowers well. Maybe I just work too slowly, I don't know...but I have another method I use when I want a more intricate pattern and don't want to have to worry about that dry time.
Another issue that comes up with dried flowers is that they are extremely fragile. Even when putting on a single flower, you can easily knock off a petal or part of a petal, especially if the edges are curling up and you're trying to push it flat. You do want to work carefully regardless, but this method also minimizes the damage somewhat. :)
Step 1) Let's start by cutting off some little flowers from the spoke. If you just snip them with your scissors, they'll fly everywhere, break, and be unusable. So what you do instead, is put your finger over the flowers to secure them, and snip them off so your finger prevents them from flying off:

Now you have one or more flowers beautifully separated from the rest:

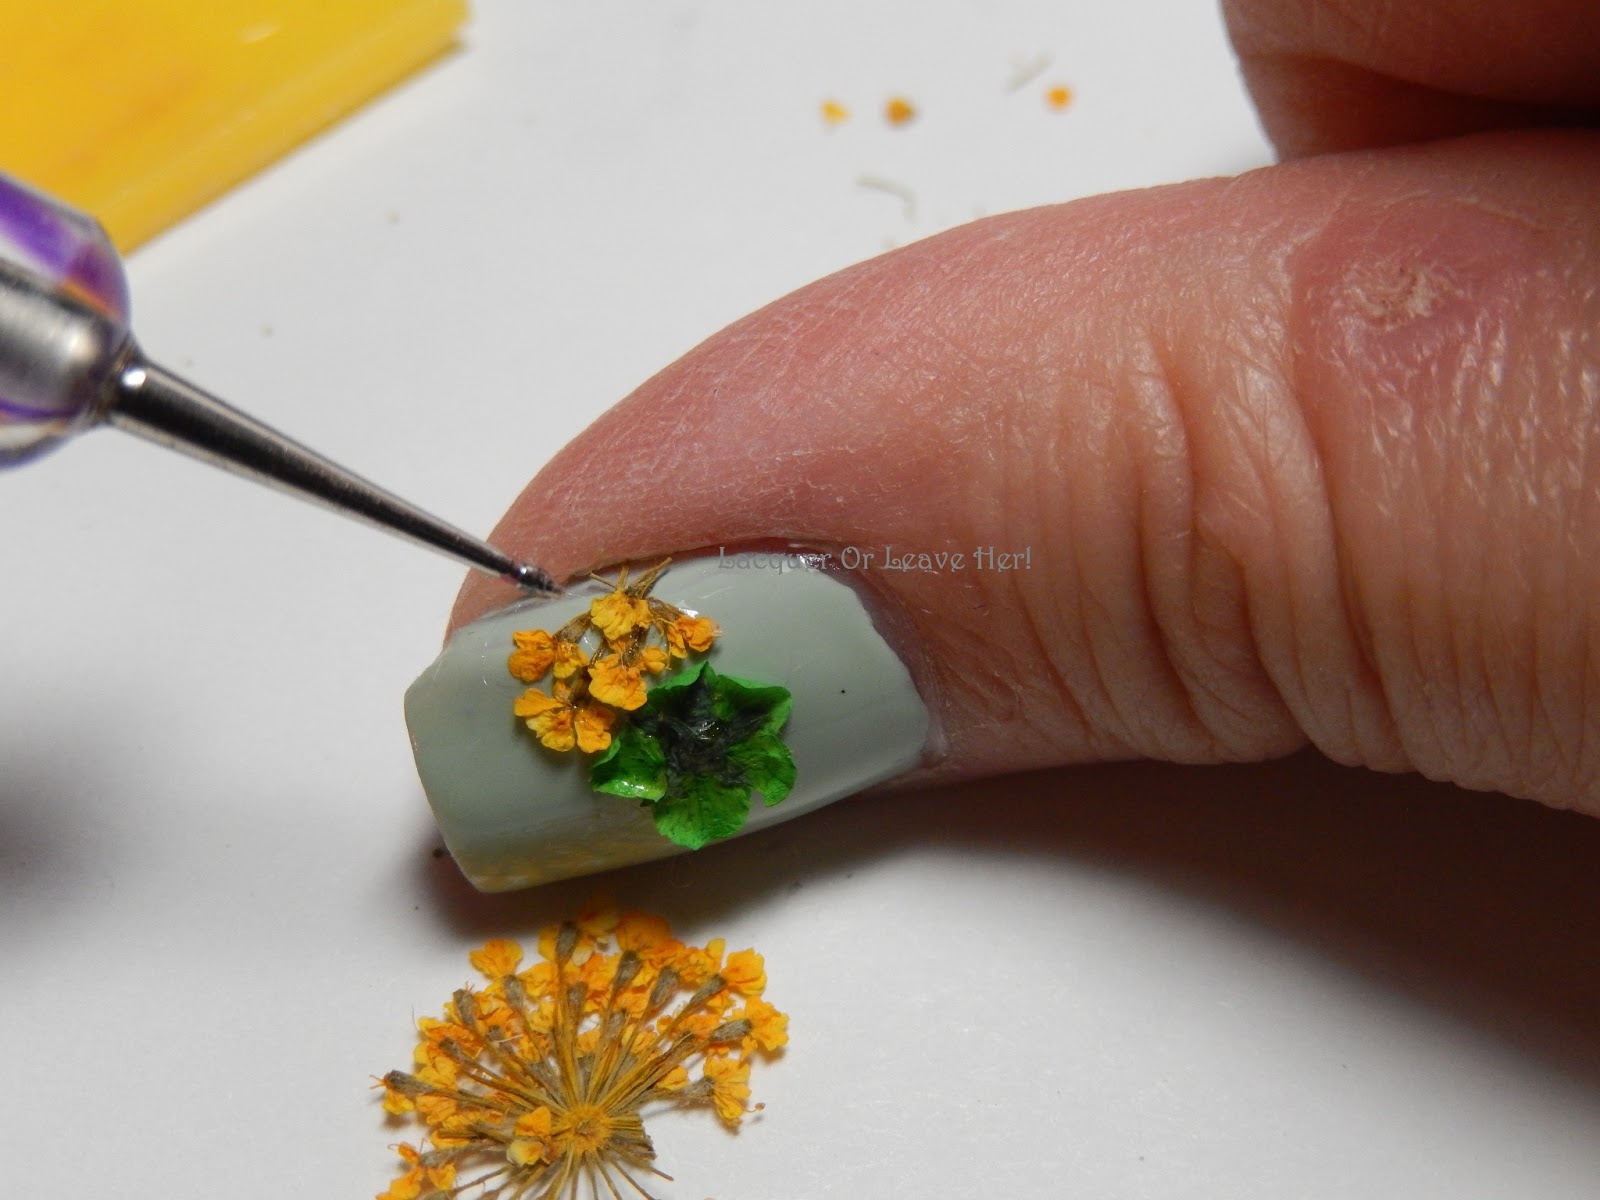
Step 2) Put some of your topcoat on a palette of some sort; I use a random piece of plastic. You're going to use this to attach your flowers:

Step 3) Using a dotting tool, put a dot (or more) of topcoat where you want your flowers to be. I'm going to attach both a single flower, and lots of little minis from the spoke flower. First, for the single flower, I'm going to put 5 dots, one for each petal, approximately where I want the flower to be (This will adhere each petal and help keep them from breaking while you work):


Step 4) Using the remaining topcoat on your dotting tool, carefully pick up the flower by touching the dotting tool to the flower. Then place it down on the nail where you put your topcoat in the previous step:


If you don't have enough topcoat left on the dotting tool to make the flower stick, put a tiny bit more on the dotting tool--but not a lot. If you put a lot, the flower won't want to come off of your dotting tool, and you'll break the petals trying to get it off. So err on the side of too little.
Step 5) For the smaller flowers, which I want to arrange into a bouquet sort of pattern, you're going to follow the same procedure, with two differences. First, use the smaller end of your dotting tool to make it easier to be precise and see what you're doing. Second, apply one dot and flower at a time--one dot of polish, one flower on top, next dot of polish, next flower on top, etc.
Here's what things look like so far. Notice how the petals of the green flower curl up a bit. There are two ways to fix this. One way is to use the small end of your dotting tool and put a bit more topcoat just under the edges that are sticking up, and then gently pat them down with your tool onto the polish. The other way I'll show you here.
.JPG)
Step 6) Cover your flowers in a generous coat of topcoat:
.JPG)
Step 7) Push down any parts of the flower that are sticking up into the topcoat with the small end of your dotting tool. You may have to have patience, because the topcoat needs to be thickening a bit or else they'll just pop back up; so push them down, and if they don't say, wait a couple of seconds and push them down again. Gently. :)

Step 8) Once your flower is all pushed down where you want it, put on a final coat of topcoat. If you didn't have to push anything down into your previous coat of topcoat, you may be able to skip this step; if I had only had the yellow flowers here, I would have been able to do that. But if you had to manipulate the flowers a little, it will leave a bit of a messy appearance in the topcoat, so a second coat will smooth that right over:
.JPG)
And here is your final result! Using this method I was able to shower after working out, and wash my hands several times through the day without losing one petal from my mani--and on that mani I had flowers on every finger. If you only use one coat of topcoat, I suspect you'll get a bit less durability. :)
.JPG)
Like I did last time, I made a little collage of most of the steps for ease of use:

Please let me know if anything here is unclear, and I'll fix it! Also, I think I'm starting to get the hang of tutorials, so please please please let me know if there are any techniques you would like to see, and I'll do my best to make a tutorial of it for you. I'm not sure what you guys would like to know, so chime in and give me direction!
Hope this was help; thanks for looking. :)
M.
No comments:
Post a Comment